| No. | Error message | Solution |
| 1 | If that looks correct, I will now generate qmail-scanner-queue.pl for your system... Continue? ([Y]/N) Y Testing suid nature of /usr/bin/suidperl... Whoa - broken perl install found. Cannot even run a simple script setuid Installation of Qmail-Scanner FAILED Error was: Can't do setuid See FAQ for further details | chmod 4711 /usr/bin/suidperl |
| 2 | freshclam: error while loading shared libraries: libclamav.so.6: cannot open shared object file: No such file or directory | export LD_LIBRARY_PATH=/usr/local/lib |
| 3 | QMAILQUEUE was not set, defaulting to /var/qmail/bin/qmail-scanner-queue.pl for this test... Sending standard test message - no viruses... done! Sending eicar test virus - should be caught by perlscanner module... qmail-inject: fatal: qq temporary problem (#4.3.0) Bad error. qmail-inject died | chmod 4755 /var/qmail/bin/qmail-scanner-queue.pl |
| 4 | /usr/local/sbin/clamd: error while loading shared libraries: libclamav.so.6: cannot open shared object file: No such file or directory | export LD_LIBRARY_PATH=/usr/local/lib |
| 5 | 451 qq temporary problem (#4.3.0) when try to send mail from qmail | Restart service clamd |
| 6 | Starting Clam AV daemon: ERROR: Problem with internal logger. Please check the permissions on the /var/log/clamav/clamd.log file. ERROR: Can\'t open /var/log/clamav/clamd.log in append mode (check permissions!). | chmod 777 /var/log/clamav/clamd.log |
| 7 | The SMTP server returned an error. Subject 'tet ', Account: '172.16.5.26', Server: '172.16.5.26', Protocol: SMTP, Server Response: 'Can't do seteuid!', Port: 25, Secure(SSL): No, Error Number: 0x800CCC60 | vi /var/qmail/bin/qmail-scanner-queue.pl ---> add “T” under the first line #!/usr/bin/perl -T |
Monday, March 28, 2011
Fix error when installing Qmail
Friday, March 25, 2011
Perl does not allow for setuid functionality
If your Perl installation does NOT allow for setuid functionality
cd /downloads/qmailrocks/qmail-scanner-1.25/contrib
make install
Now we will customize the qmail-scanner configuration script...
cd /downloads/qmailrocks/qmail-scanner-1.25
vi qms-config-cwrapper
You will notice several fields that need to be customized to fit your needs. Let's have a look. I've highlighted the fields you should customize in RED
#!/bin/sh
if [ "$1" != "install" ]; then
INSTALL=
else
INSTALL="--install"
fi
./configure --domain yourdomain.com \
--admin postmaster \
--local-domains "yourdomain.com,yourotherdomain.com" \
--add-dscr-hdrs yes \
--dscr-hdrs-text "X-Antivirus-MYDOMAIN" \
--ignore-eol-check yes \
--sa-quarantine 0 \
--sa-delete 0 \
--sa-reject no \
--sa-subject ":SPAM:" \
--sa-delta 0 \
--sa-alt yes \
--sa-debug no \
--notify admin \
--skip-setuid-test \
"$INSTALL"
Now save and exit out of the config file. That was easy, wasn't it.
And now we will run a test config for qmail-scanner...
chmod 755 qms-config-cwrapper
./qms-config-cwrapper
Answer YES to all questions. If you get no errors, you can then run the script in "install" mode and this will install qmail-scanner on your server. If you do get errors, check out these troubleshooting tips.
./qms-config-cwrapper install
Again, answer YES to all questions. If you get no errors, you can then run the script in "install" mode and this will install qmail-scanner on your server. If you do get errors, check out these troubleshooting tips.
vi /var/qmail/bin/qmail-scanner-queue.pl
Then change the first line of /var/qmail/bin/qmail-scanner-queue.pl
to "#!/usr/bin/perl (in other words, remove the "-T" from the perl call.)
chmod 0755 /var/qmail/bin/qmail-scanner-queue.pl
And now all that's left for qmail-scanner is to initiate the version file and the perlscanner database...
First, we'll initialize the version file. This command also helps to keep your server's /var/spool/qmailscan folder clear of rogue files that can develop when SMTP sessions are dropped. You may want to stick this command into your server's crontab and run it once a day. You'll see more on this in the "maintaining your qmail server" step near the end of this tutorial.. So let's run it...
/var/qmail/bin/qmail-scanner-queue -z
And now we will generate a new perlscanner database for qmailp-scanner. For future reference, it's a good idea to run this next command whenever you upgrade qmail-scanner. You'll see more on this in the "maintaining your qmail server" step near the end of this tutorial. So let's do i t...
/var/qmail/bin/qmail-scanner-queue -g
A successful database build should produce the following output:
perlscanner: generate new DB file from /var/spool/qmailscan/quarantine-attachments.txt
perlscanner: total of 9 entries.
And now one final ownership check...
chown -R qscand:qscand /var/spool/qmailscan
Woohoo, qmail-scanner is installed! Now it's time to tie qmail-scanner into qmail itself.
vi /var/qmail/supervise/qmail-smtpd/run
To instruct Qmail to use Qmail-Scanner as the alternative queuing mechanism, we add the following line to the SMTP "run" script right under the first line (#!/bin/sh):
QMAILQUEUE="/var/qmail/bin/qmail-scanner-queue" ; export QMAILQUEUE
..and we change the "softlimit" in that same script...
change softlimit to 40000000
Note: It is absolutely vital that you change the "Softlimit" setting in this script. If you don't, qmail may fail to deliver mail!!!
So now the qmail-smtp/run file should look like this:
#!/bin/sh
QMAILQUEUE="/var/qmail/bin/qmail-scanner-queue" ; export QMAILQUEUE
QMAILDUID=`id -u vpopmail`
NOFILESGID=`id -g vpopmail`
MAXSMTPD=`cat /var/qmail/control/concurrencyincoming`
LOCAL=`head -1 /var/qmail/control/me`
if [ -z "$QMAILDUID" -o -z "$NOFILESGID" -o -z "$MAXSMTPD" -o -z "$LOCAL" ]; then
echo QMAILDUID, NOFILESGID, MAXSMTPD, or LOCAL is unset in
echo /var/qmail/supervise/qmail-smtpd/run
exit 1
fi
if [ ! -f /var/qmail/control/rcpthosts ]; then
echo "No /var/qmail/control/rcpthosts!"
echo "Refusing to start SMTP listener because it'll create an open relay"
exit 1
fi
exec /usr/local/bin/softlimit -m 40000000 \
/usr/local/bin/tcpserver -v -R -l "$LOCAL" -x /etc/tcp.smtp.cdb -c "$MAXSMTPD" \
-u "$QMAILDUID" -g "$NOFILESGID" 0 smtp \
/var/qmail/bin/qmail-smtpd your_domain.com \
/home/vpopmail/bin/vchkpw /usr/bin/true 2>&1
Once you've got the qmail-smtpd file modified, save the changes and exit from the file. Now we will finalize the qmail-scanner installation by going over some post-install configuration options. After that, we'll fire everything up and take qmail-scanner for a test drive!
Click Here to continue
To activate all the changes we just made, we're going to have to completely stop and restart qmail.
Stop it...
qmailctl stop
and start it...
qmailctl start
And a quick check of the qmail processes, just to be safe..
qmailctl stat
Now it's time to test the whole damn thing to see if Qmail-Scanner, Spamassassin and Clam AV are all working correctly. Fortunately, Qmail-Scanner comes with it's own testing script that does a fantastic job. So let's test it!
cd /downloads/qmailrocks/qmail-scanner-1.25/contrib
chmod 755 test_installation.sh
./test_installation.sh -doit
A successful test should produce the following output. 2 messages should be quarantined by Clam Antivirus in /var/spool/quarantine/new and 2 messages should be set to whatever mailbox you specified in the Qmail-scanner configuration script. Don't worry if you don't get virus notification emails. The normal notification emails that get sent out upon virus detection usually don't work during the test.
setting QMAILQUEUE to /var/qmail/bin/qmail-scanner-queue.pl for this test...
Sending standard test message - no viruses...
done!
Sending eicar test virus - should be caught by perlscanner module...
done!
Sending eicar test virus with altered filename - should only be caught by commercial anti-virus modules (if you have any)...
Sending bad spam message for anti-spam testing - In case you are using SpamAssassin...
Done!
Finished test. Now go and check Email for postmaster@mydomain.com
If you get 2 messages in your inbox and you see 2 messages in the quarantine folder, it's time to crack open a cold one! You've successfully installed all 3 packages! Woohoo!
cd /downloads/qmailrocks/qmail-scanner-1.25/contrib
make install
Now we will customize the qmail-scanner configuration script...
cd /downloads/qmailrocks/qmail-scanner-1.25
vi qms-config-cwrapper
You will notice several fields that need to be customized to fit your needs. Let's have a look. I've highlighted the fields you should customize in RED
#!/bin/sh
if [ "$1" != "install" ]; then
INSTALL=
else
INSTALL="--install"
fi
./configure --domain yourdomain.com \
--admin postmaster \
--local-domains "yourdomain.com,yourotherdomain.com" \
--add-dscr-hdrs yes \
--dscr-hdrs-text "X-Antivirus-MYDOMAIN" \
--ignore-eol-check yes \
--sa-quarantine 0 \
--sa-delete 0 \
--sa-reject no \
--sa-subject ":SPAM:" \
--sa-delta 0 \
--sa-alt yes \
--sa-debug no \
--notify admin \
--skip-setuid-test \
"$INSTALL"
Now save and exit out of the config file. That was easy, wasn't it.
And now we will run a test config for qmail-scanner...
chmod 755 qms-config-cwrapper
./qms-config-cwrapper
Answer YES to all questions. If you get no errors, you can then run the script in "install" mode and this will install qmail-scanner on your server. If you do get errors, check out these troubleshooting tips.
./qms-config-cwrapper install
Again, answer YES to all questions. If you get no errors, you can then run the script in "install" mode and this will install qmail-scanner on your server. If you do get errors, check out these troubleshooting tips.
vi /var/qmail/bin/qmail-scanner-queue.pl
Then change the first line of /var/qmail/bin/qmail-scanner-queue.pl
to "#!/usr/bin/perl (in other words, remove the "-T" from the perl call.)
chmod 0755 /var/qmail/bin/qmail-scanner-queue.pl
And now all that's left for qmail-scanner is to initiate the version file and the perlscanner database...
First, we'll initialize the version file. This command also helps to keep your server's /var/spool/qmailscan folder clear of rogue files that can develop when SMTP sessions are dropped. You may want to stick this command into your server's crontab and run it once a day. You'll see more on this in the "maintaining your qmail server" step near the end of this tutorial.. So let's run it...
/var/qmail/bin/qmail-scanner-queue -z
And now we will generate a new perlscanner database for qmailp-scanner. For future reference, it's a good idea to run this next command whenever you upgrade qmail-scanner. You'll see more on this in the "maintaining your qmail server" step near the end of this tutorial. So let's do i t...
/var/qmail/bin/qmail-scanner-queue -g
A successful database build should produce the following output:
perlscanner: generate new DB file from /var/spool/qmailscan/quarantine-attachments.txt
perlscanner: total of 9 entries.
And now one final ownership check...
chown -R qscand:qscand /var/spool/qmailscan
Woohoo, qmail-scanner is installed! Now it's time to tie qmail-scanner into qmail itself.
vi /var/qmail/supervise/qmail-smtpd/run
To instruct Qmail to use Qmail-Scanner as the alternative queuing mechanism, we add the following line to the SMTP "run" script right under the first line (#!/bin/sh):
QMAILQUEUE="/var/qmail/bin/qmail-scanner-queue" ; export QMAILQUEUE
..and we change the "softlimit" in that same script...
change softlimit to 40000000
Note: It is absolutely vital that you change the "Softlimit" setting in this script. If you don't, qmail may fail to deliver mail!!!
So now the qmail-smtp/run file should look like this:
#!/bin/sh
QMAILQUEUE="/var/qmail/bin/qmail-scanner-queue" ; export QMAILQUEUE
QMAILDUID=`id -u vpopmail`
NOFILESGID=`id -g vpopmail`
MAXSMTPD=`cat /var/qmail/control/concurrencyincoming`
LOCAL=`head -1 /var/qmail/control/me`
if [ -z "$QMAILDUID" -o -z "$NOFILESGID" -o -z "$MAXSMTPD" -o -z "$LOCAL" ]; then
echo QMAILDUID, NOFILESGID, MAXSMTPD, or LOCAL is unset in
echo /var/qmail/supervise/qmail-smtpd/run
exit 1
fi
if [ ! -f /var/qmail/control/rcpthosts ]; then
echo "No /var/qmail/control/rcpthosts!"
echo "Refusing to start SMTP listener because it'll create an open relay"
exit 1
fi
exec /usr/local/bin/softlimit -m 40000000 \
/usr/local/bin/tcpserver -v -R -l "$LOCAL" -x /etc/tcp.smtp.cdb -c "$MAXSMTPD" \
-u "$QMAILDUID" -g "$NOFILESGID" 0 smtp \
/var/qmail/bin/qmail-smtpd your_domain.com \
/home/vpopmail/bin/vchkpw /usr/bin/true 2>&1
Once you've got the qmail-smtpd file modified, save the changes and exit from the file. Now we will finalize the qmail-scanner installation by going over some post-install configuration options. After that, we'll fire everything up and take qmail-scanner for a test drive!
Click Here to continue
To activate all the changes we just made, we're going to have to completely stop and restart qmail.
Stop it...
qmailctl stop
and start it...
qmailctl start
And a quick check of the qmail processes, just to be safe..
qmailctl stat
Now it's time to test the whole damn thing to see if Qmail-Scanner, Spamassassin and Clam AV are all working correctly. Fortunately, Qmail-Scanner comes with it's own testing script that does a fantastic job. So let's test it!
cd /downloads/qmailrocks/qmail-scanner-1.25/contrib
chmod 755 test_installation.sh
./test_installation.sh -doit
A successful test should produce the following output. 2 messages should be quarantined by Clam Antivirus in /var/spool/quarantine/new and 2 messages should be set to whatever mailbox you specified in the Qmail-scanner configuration script. Don't worry if you don't get virus notification emails. The normal notification emails that get sent out upon virus detection usually don't work during the test.
setting QMAILQUEUE to /var/qmail/bin/qmail-scanner-queue.pl for this test...
Sending standard test message - no viruses...
done!
Sending eicar test virus - should be caught by perlscanner module...
done!
Sending eicar test virus with altered filename - should only be caught by commercial anti-virus modules (if you have any)...
Sending bad spam message for anti-spam testing - In case you are using SpamAssassin...
Done!
Finished test. Now go and check Email for postmaster@mydomain.com
If you get 2 messages in your inbox and you see 2 messages in the quarantine folder, it's time to crack open a cold one! You've successfully installed all 3 packages! Woohoo!
Tuesday, March 22, 2011
Mount encrypt hardisk
First of all
su root
EX: cryptsetup luksOpen /dev/sdb1 Crypto (sdb1 view and see in Partioner)
Type password hardisk encrypt. You open /dev/mapper/ and see Crypto
mount /dev/mapper/Crypto /media
umount
cryptsetup luksClose Crypto
su root
EX: cryptsetup luksOpen /dev/sdb1 Crypto (sdb1 view and see in Partioner)
Type password hardisk encrypt. You open /dev/mapper/ and see Crypto
mount /dev/mapper/Crypto /media
umount
cryptsetup luksClose Crypto
Wednesday, March 16, 2011
Migrate password in qmail by mysql
- step 1: login to http://172.16.5.26/cgi-bin/vqadmin/vqadmin.cgi ---> Remove domain abc.com.vn
- step 2: Create new domain abc.com.vn
- step 3: Create new email accounts one by one
- step 4: Copy "Maildir" from old one to new one
- step 5: Login to mysql ---> copy & paste encrypt password to new server one by one
- step 6: retart qmail ---> qmailctrl restart
- Finish.
- step 2: Create new domain abc.com.vn
- step 3: Create new email accounts one by one
- step 4: Copy "Maildir" from old one to new one
- step 5: Login to mysql ---> copy & paste encrypt password to new server one by one
- step 6: retart qmail ---> qmailctrl restart
- Finish.
Tuesday, March 15, 2011
Triển khai ứng dụng thư điện tử sử dụng qmail, courier mail và squirrel mail
http://2mit.org/forum/showthread.php/11374-Trien-khai-ung-dung-thu-dien-tu-su-dung-qmail-courier-mail-va-squirrel-mail
Đầu tiên, Chào mừng các bạn đã đến với diễn đàn sinh viên Việt-Hàn 2MIT.ORG .Sau đây là chuyên đề về Qmail, SUN sẽ giới thiệu từ lý thuyết đến thực hành cấu hình một hệ thống mail server hoàn chỉnh sử dụng MTA Qmail. Tài liệu này được tác giả lấy từ nhiều nguồn khác nhau chủ yếu dịch từ trang qmailrocks.org và tham khảo trên HVA, tổng hợp, triển khai trên distro CentOS 5.
Một lời khuyên cho các bạn. Trước khi tham khảo và làm theo tài liệu này, các bạn nên ghé thăm trang chủ http://qmail.org, http://qmailrocks.org và bài hướng dẫn triển khai mail gateway sử dụng MTA Qmail của các bật tiền bối HVA.
Tài liệu tham khảo:
Sách:
[1]. The qmail Handbook - Dave Sill
Địa chỉ tham khảo thêm:
[1]. http://hvaonline.net
[2]. http://qmailrocks.org
[3]. http://qmail.org
[4]. http://www.courier-mta.org/
[5]. http://squirrelmail.org/
Phần 1: Giới thiệu về Qmail
1.1.Giới thiệu về Qmail
1.1.1. Sơ lược về Qmail
Qmail được viết bởi Tiến sĩ toán của trường đại học Illinois - Chicago ông Dan Bernstein. Qmail ra đời vào tháng Giêng năm 1996 với một phiên bản Beta 0.70 và sau đó phiên bản Gamma 0.90 được cập nhật vào tháng 8 năm 1996. Phiên bản ổn định 1.0 được ra mắt vào tháng 2 năm 1997. Phiên bản được lưu hành hiện nay là 1.03 được phát hành vào tháng 6 năm 1997.
Qmail là một MTA đầy đủ tính năng. Nó xử lý tất cả các tính năng cơ bản của một MTA bao gồm dịch vụ SMTP, POP3, SMTP delivery, xếp hàng và quản lý hàng đợi… hỗ trợ cho aliases , mailing, virtual users, virtual domains, và forwarding.
1.1.2. Tại sao dùng Qmail?
Có rất nhiều MTA trên môi trường Unix hiện nay và mỗi khi nhắc đến MTA chúng ta phải nhắc đến Sendmail. Sendmail được viết khi Internet là một môi trường rất thân thiện, không cần phải thiết kế đảm bảo vấn đề bảo mật cao. Ngày nay, Internet là một môi trường đầy nguy cơ với vấn đề bảo mật cho máy chủ mạng. Hơn nữa, Dan Bernstein viết Qmail vì ông ta thấy rằng Sendmail thừa hưởng nhiều lỗi bảo mật từ các phiên bản trước đây và phần mềm này rất cồng kềnh, cho dù những năm gần đây, nhóm Sendmail không ngừng điều chỉnh và cải tiến phần mềm này để giảm thiểu những yếu điểm.
Bernstein, người tạo nên Qmail tự tin rằng qmail là an toàn và ông đảm bảo nó trong tuyên báo bảo lãnh của mình (http://cr.yp.to/qmail/guarantee.html), ông còn cung cấp 1000 đôla trong một năm cho những ai tìm thấy lỗi bảo mật trong Qmail và giải thưởng này vẫn chưa có ai có thể đạt được.
Khi viết Qmail, ngoài ưu tiên cho vấn đề bảo mật, Dan Bernstein chú trọng rất nhiều đến khả năng hoạt động và tính dễ dùng của nó. Qmail mang tính truyền thống của các hoạt trình Unix: mỗi tiểu ứng trình có khả năng đảm đương trọn vẹn một chức năng chuyên biệt và các tiểu ứng trình này có thể chuyền (pipe) sang các tiểu ứng trình khác để đáp ứng các quy trình phức tạp. Bởi thế, Qmail bao gồm nhiều binaries tạo thành một dây chuyền hoạt động. Ðây là một điển hình nặng tính bảo mật và tính hiệu năng trong cơ chế điều hành của một MTA.
Qmail rất ổn định và hiệu năng: qmail thích hợp cho các mail server lớn với khả năng chuyển nhận hàng triệu thông điệp một ngày (dựa vào tài liệu trên web site của http://qmail.org).
Một số Mail server lớn trên internet sử dụng Qmail như Yahoo!, Network solutions, Verio, MessageLabs, listserv.acsu.buffalo.edu (một server mail lớn, sử dụng Qmail vào 1996), Ohio State (trường đại học lớn ở Mỹ), Listbot, USWest.net (Western US ISP), Telenordia, gmx.de (German ISP), NetZero (free ISP), Critical…
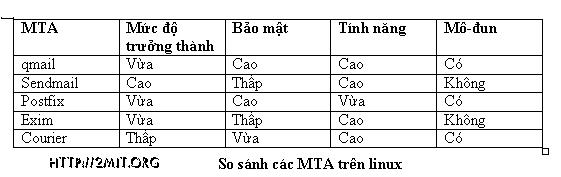
Qmail thích hợp cho các server có kết nối tốt, tốc độ, băng thông cao và luôn kết nối trên mạng. Với các doanh nghiệp, tổ chức vừa và nhỏ, chưa đáp ứng được các yêu cầu trên thì nên sử dụng các MTA khác phù hợp hơn như Posfix..
Sau đây là bản so sánh một số MTA trên hoạt động trên linux.

1.2.Cấu trúc Qmail
1.2.1.Cấu trúc hệ thống mô-đun


MTA trên Internet thực hiện nhiều nhiệm vụ. Thiết kế như Sendmail và Smail là thiết kế nguyên khối, nhưng đối với Qmail thì khác, Qmail được thiết kế theo dạng mô-đun. Các chương trình riêng biệt thực hiện các chức năng khác nhau. Các mô-đun của Qmail làm việc độc lập với nhau trên các quyền hệ thống khác nhau. Kết quả là chương trình được chia ra thành các chương trình nhỏ hơn, đơn giản hơn và ít bị các lỗi về chức năng, bảo mật… Hình mô tả cấu trúc mô-đun của Qmail.

1.2.2. Cấu trúc File
Thư mục /var/qmail mặc định là thư mục gốc của qmail khi được cài đặt. Chúng ta có thể thay đường dẫn này trong quá trình cài đặ qmail, đây cũng là ý tưởng tốt để tăng độ bảo mật, vì người khác sẽ khó khăn trong quá trình tìm kiếm thưc mục cài đặt của qmail.


Qmail - Phần 2: Cài đặt qmail từ mã nguồn.
Qmail - Phần 2: Cài đặt qmail từ mã nguồn.
Qmail - Phần 3: Cài đặt Ezmlm, Autoresponder, Vpopmail tích hợp MySQL
Qmail - Phần 4: Cài đặt Vqadmin, Maildrop và Qmailadmin
Qmail - Phần 5: Cấu hình khởi động Qmail - Gỡ bỏ Sendmail và Khởi động Qmail
Ở phần 1, SUN đã giới thiệu cho các bạn phần lý thuyết về MTA Qmail. Với phần 2 này, SUN sẽ giới thiệu cài đặt và cấu hình MTA Qmail bao gồm cài đặt gói qmail chính, cài đặtucspi-tcp và daemontools. Sau khi thực hành thành công phần 2 này, cơ bản bạn sẽ có một mail server với Qmail, nhưng thế vẫn chưa đủ. Còn rất nhiều thành phần cần thiết để đảm bảo một mail server hoạt động và cung cấp dịch vụ chuyên nghiệp. Các thành phần mở rộng cho qmail sẽ được giới thiệu ở phần 3 trở đi.
Trước tiên chúng ta sẽ đi vào các điều kiện cần thiết để biên dịch và cài đặt, vận hành mail server với qmail.
Phần 2.Cài đặt Qmail từ mã nguồn
2.1. Chuẩn bị trước khi cài đặt:
2.1.1. Thông tin Server
- Distro: Red Hat CentOS
- Hostname: mail.viet-cntt.com
- IP 192.168.137.20
- Dung lượng ổ đĩa.
+ Phân vùng / Khoảng 70Mb dung lượng ổ cứng
+ Phân vùng /var khoảng 10Mb
+ Phân vùng /home ít nhất 3Mb để chứa vpopmail
2.1.2. Các gói phần mềm cần cài đặt trước trên server
- Apache web server: Phiên bản 2.x trở lên
PHP: Phiên bản 4.0.6 trở lên. Trong /etc/php.ini . Chắc chắn rằng tham số file_uploads = On
- Perl: Phiên bản 4.8..0 trở lên.
- GCC: Bao gồm đầy đủ bộ thư viện biên dịch
- MySQL 4.x trở lên.
- OpenSSL và OpenSSL-devel : Phiên bản 0.9.5a trở lên hoặc cao hơn
- wget: Gói phần mền giúp download.
- patch & patchutils
- Máy Server DNS
+ Địa chỉ 192.168.137.12
+ Đã khai báo record MX trỏ tới server mail.viet-cntt.com
- Các port trên firewall cần được mở.

2.2.Cài đặt qmail từ mã nguồn.
2.2.1.Download và giải nén các gói cần thiết.
Lưu ý: trong quá trình cài đặt luôn luôn ở quyền root.
Code:
[root@mail ~]# mkdir /downloads
[root@mail ~]# cd /downloads
[root@mail downloads]# wget http://www.qmailrocks.org/downloads/qmailrocks.tar.gz
[root@mail downloads]# tar zxvf qmailrocks.tar.gz
Tạo các thư mục cần thiết:
Code:
[root@mail downloads]# cd /downloads/qmailrocks
Tạo thư mục khởi đầu cho qmail
[root@mail downloads]# mkdir -p /var/qmail
[root@mail downloads]# mkdir /usr/src/qmail
Giải nén các gói qmail, ucspi-tcp và daemontools.
Code:
[root@mail downloads]# cd /usr/src/qmail
[root@mail qmail]# tar zxvf /downloads/qmailrocks/qmail-1.03.tar.gz
[root@mail qmail]# tar zxvf /downloads/qmailrocks/ucspi-tcp-0.88.tar.gz
[root@mail qmail]# mkdir -p /package
[root@mail qmail]# chmod 1755 /package
[root@mail qmail]# cd /package
[root@mail package]# tar zxvf /downloads/qmailrocks/daemontools-0.76.tar.gz
Tạo tài khoản dân dụng và các nhóm dân dụng
Code:
[root@mail ~]# groupadd nofiles
[root@mail ~]# useradd -g nofiles -d /var/qmail/alias -s /sbin/nologin -p'*' alias
[root@mail ~]# useradd -g nofiles -d /var/qmail -s /sbin/nologin -p'*' qmaild
[root@mail ~]# useradd -g nofiles -d /var/qmail -s /sbin/nologin -p'*' qmaill
[root@mail ~]# useradd -g nofiles -d /var/qmail -s /sbin/nologin -p'*' qmailp
[root@mail ~]# groupadd qmail
[root@mail ~]# useradd -g qmail -d /var/qmail -s /sbin/nologin -p'*' qmailq
[root@mail ~]# useradd -g qmail -d /var/qmail -s /sbin/nologin -p'*' qmailr
[root@mail ~]# useradd -g qmail -d /var/qmail -s /sbin/nologin -p'*' qmails
[root@mail ~]# groupadd vchkpw
[root@mail ~]# useradd -g vchkpw -d /home/vpopmail -s /sbin/nologin -p'*' vpopmail
Tạo và phân quyền các thư mục chứa log
Code:
[root@mail package]# mkdir /var/log/qmail
[root@mail package]# cd /var/log/qmail
[root@mail qmail]# mkdir qmail-send qmail-smtpd qmail-pop3d
[root@mail qmail]# chown -R qmaill:root /var/log/qmail
[root@mail qmail]# chmod -R 750 /var/log/qmail
Tạo và phân quyền các thư mục chứa các scripts giám sát.
Code:
[root@mail qmail]# mkdir /var/qmail/supervise
[root@mail qmail]# cd /var/qmail/supervise
[root@mail supervise]# mkdir -p qmail-smtpd/log qmail-send/log qmail-pop3d/log
[root@mail supervise]# chmod +t qmail-smtpd qmail-send qmail-pop3d
[root@mail supervise]# echo 211 > /usr/src/qmail/qmail-1.03/conf-split
[root@mail supervise]# echo 255 > /usr/src/qmail/qmail-1.03/conf-spawn
2.2.2.Cài đặt Qmail
Thực hiện các miếng vá cần thiết trước khi đi vào cài đặt
Code:
[root@mail ~]# PATH=/usr/local/bin:/usr/bin:/bin:/usr/local/sbin:/sbin
[root@mail ~]# cd /usr/src/qmail/qmail-1.03
[root@mail ~]# patch < /downloads/qmailrocks/patches/qmail-1.03-jms1.5.patch [root@mail ~]# patch < /downloads/qmailrocks/patches/qmail-1.03-forcetls-20040703.patch Bắt đầu thực hiện compile và build qmail. [root@mail ~]# cd /usr/src/qmail/qmail-1.03 [root@mail qmail-1.03]# make man && make setup check Lệnh make buộc compiler biên dịch mã nguồn của qmail dựa trên chỉnh định của hồ sơ Makefile. Lệnh make setup check. Ðây là 2 lệnh gom lại thành một.. Lệnh thứ nhất make setup chuyển các binaries đã được build ở trên vào đúng nơi của nó. Lệnh thứ nhì make check là lệnh dùng để kiểm tra lại thực tính của các hồ sơ và binaries được build. Ðánh lệnh ./config-fast với thông số là domain name Code: [root@mail qmail-1.03]# ./config-fast mail.viet-cntt.com Lệnh trên dùng để khai báo thống số tên miền. Đã xong quá trình cài đặt gói qmail chính, tiếp theo thực hiện cài đặt chứng nhận an toàn sử dụng để mã hóa TLS trong các phiên làm việc của SMTP Code: [root@mail qmail-1.03]# make cert Điền các thông số cần thiết. Code: Country Name (2 letter code) [GB]:VN State or Province Name (full name) [Berkshire]:VietNam Locality Name (eg, city) [Newbury]:DaNang Organization Name (eg, company) [My Company Ltd]:VietHanIT Organizational Unit Name (eg, section) []:mail Common Name (eg, your name or your server's hostname) []:mail.viet- cntt.com Email Address []:postmaster@viet-cntt.com Nếu quá trình thực hiện thành công sẽ tự động cài đặt ở /var/qmail/control/servercert.pem và các liên kết mềm ở /var/qmail/control/clientcert.pem 2.2.3.Cài đặt ucspi-tcp Ucspi-tcp là phần mềm Dr. Dan Bernstein viết với mục đích thay thế cho inet daemon của Unix. Inet daemon được dùng rộng rãi trên các ứng trình Unix và gần đây, xinet ra đời để nâng cao tính năng của inet. Theo Dr Bernstein, phần mềm ucspi-tcp gọn nhẹ, hiệu quả và an toàn hơn inet rất nhiều. Ucspi-tcp được tạo ra với quan tâm bảo mật nên cách xử lý socket giữa client và server rất hiệu quả. Thực tế cho thấy ucspi-tcp hoạt động rất phù hợp với qmail. Di chuyển con trỏ vào thư mục uscpi-tcp để compile và build uscpi-tcp Code: [root@mail qmail-1.03]# cd /usr/src/qmail/ucspi-tcp-0.88/ Thực hiện compile và build Code: [root@mail qmail-1.03]# patch < /downloads/qmailrocks/patches/ucspi-tcp-0.88.errno.patch [root@mail qmail-1.03]# make && make setup check 2.2.4. Cài đặt daemontools Daemontools là một phần mềm giúp bạn rất nhiều trong quy trình quản lý và điều hành qmail server. Thực hiện các miếng vá cần thiết Code: [root@mail ucspi-tcp-0.88]# cd /package/admin/daemontools-0.76/src [root@mail src]# patch < /downloads/qmailrocks/patches/daemontools-0.76.errno.patch [root@mail src]#cd /package/admin/daemontools-0.76 [root@mail daemontools-0.76]# package/install Để kiểm tra xem daemontools có cài đặt thành công hay không, ta thực hiện lệnh xem tiến trình ps –aux . Nếu xuất hiện tiến trình svcanboot nghĩa là đã cài đặt thành công.

Nếu không có lõi gì xảy ra, cơ bản chúng ta đã có một mail server với MTA là qmail, phần tiếp theo SUN sẽ trình bày cho các bạn các thành phần khác kết hợp với Qmail như Ezmlm, Vqadmin....
Qmail - Phần 3: Cài đặt Ezmlm, Autoresponder, Vpopmail tích hợp MySQL
Tiếp theo phần này. SUN sẽ hướng dẫn các bạn cài đặt các tiện ích cho Qmail như Ezmlm, Autoresponder và Vpopmail
3.1.Cài đặt Ezmlm
Ezmlm là tiện ích cộng thêm cho Qmail, giúp quản lý danh sách email rất tốt. Đặt biệt là tích hợp với Qmailadmin (Qmail admin sẽ được giới thiệu ở các phần sau).
Chúng ta đi vào biên dịch và cài đặt
Code:
[root@mail src]# cd /downloads/qmailrocks/
[root@mail qmailrocks]# tar zxvf ezmlm-0.53-idx-0.41.tar.gz
[root@mail qmailrocks]# cd ezmlm-0.53-idx-0.41
[root@mail ezmlm-0.53-idx-0.41]# make && make setup
3.2.Cài đặt Autoresponder
Autoresponder là tiện ích giúp trả lời thư tự động. Chúng ta có thể không cấu hình tiện ích này nhưng nếu một hệ thống mail hoàn chỉnh thì tính năng này được khuyên dùng.
Code:
[root@mail ezmlm-0.53-idx-0.41]# cd /downloads/qmailrocks
[root@mail qmailrocks]# tar zxvf autorespond-2.0.5.tar.gz
[root@mail qmailrocks]# cd autorespond-2.0.5
[root@mail autorespond-2.0.5]# make && make install
3.3.Cài đặt Vpopmail tích hợp MySQL
Vpopmail là một trong những thành phần chính trong quá trình cài đặt qmail. Vpopmail giúp chúng ta làm ảo miền mail hosting, bao gồm rất nhiều tính năng để việc quản lý mail đơn giản và thuận tiện.
Có hai cách cài đặt Vpopmail là cách không tích hợp MySQL và cách có tích hợp MySQL. Quá trình cài đặt không tích hợp MySQL sẽ đơn giản hơn nhiều vì không liên quan đến cấu hình tích hợp MySQL. Đối với các mail server với quy mô lớn, lời khuyên đến từ các chuyên gia qmail là nên cài đặt tích hợp MySQL để tăng hiệu xuất hoạt động.
Khi cấu hình và cài đặt vpopmail tích hợp MySQL. Tất cả thông tin về các domain (tên miền, người dùng email, mật khẩu..) đều được lưu trữ trong cơ sở dữ liệu mysql. Các nội dung các email gởi tới không được lưu giữ trong cơ sở dữ liệu và vẫn lưu giữ trong các khu vực riêng tùy chọn vào người quản trị cấu hình Vpopmail.
Code:
[root@mail ~]# mkdir ~vpopmail/etc
[root@mail ~]# chown vpopmail:vchkpw ~vpopmail/etc
[root@mail ~]# echo "localhost|0|admin|121212|vpopmail" > ~vpopmail/etc/vpopmail.mysql
Câu lệnh trên dùng để khai báo người sử dụng vpopmail với tài khoản là admin và mật khẩu là 121212
Code:
[root@mail ~]# chown vpopmail:vchkpw ~vpopmail/etc/vpopmail.mysql
[root@mail ~]# chmod 640 ~vpopmail/etc/vpopmail.mysql
Khởi động dịch vụ MySQL bằng lệnh service mysql start, nếu mật khẩu root chưa khai báo, ta tiến hành khai báo mật khẩu tài khoản root của MySQL là 121212 bằng lệnh.
Code:
[root@mail ~]# service mysqld start
[root@mail ~]# mysqladmin -u root password 121212
Đăng nhập vào MySQL với tài khoảng root và mật khẩu vừa tạo để tạo database có tên vpopmail
Code:
[root@mail ~]# mysql -u root -p
mysql> CREATE DATABASE vpopmail;
Query OK, 1 row affected (0.00 sec)
Chèn các thông tin đăng nhập của người dùng Vpopadmin vào MySQL. Cụ thể tên đăng nhập là admin, mật khẩu là 121212
Code:
mysql> GRANT select,insert,update,delete,create,drop ON vpopmail.* TO admin@localhost IDENTIFIED BY '121212';
mysql>quit
Code:
[root@mail ~]# cd /downloads/qmailrocks
[root@mail qmailrocks]# tar zxvf vpopmail-5.4.13.tar.gz
[root@mail qmailrocks]# cd vpopmail-5.4.13
[root@mail vpopmail-5.4.13]# ./configure --enable-logging=p --enable-auth-module=mysql --disable-passwd --enable-clear-passwd --disable-many-domains --enable-auth-logging --enable-sql-logging --enable-valias --disable-mysql-limit
[root@mail vpopmail-5.4.13]# make && make install-strip
Đã xong phần 3. Phần 4 mình sẽ trình bày về vqadmin, maildrop, qmailadmin...
-SUN-
Qmail - Phần 4: Cài đặt Vqadmin, Maildrop và Qmailadmin.
Bây giờ khi đã thực hiện xong phần 1, 2, 3. Chúng ta sẽ tiếp tục với phần 4 để cài đặt các tiện ích không thể thiếu cho Qmail như Vqadmin, Maildrop, Qmailadmin.
4.1.Cài đặt Vqadmin
Vqadmin đơn giản là một giao diện web, qua đó cho phép chúng ta quản lý Vpopmail. Thông qua giao diện có thể tạo ra các miền mới, người dùng mới, áp đặt các hạng ngạch, cho phép các dịch vụ và nhiều hơn nữa.
Vậy Vqadmin dành cho ai ? Câu trả lời là vqadmin dành cho người quản trị có quyền cao nhất sử dụng.
Một ví dụ cụ thể, quản trị viên đang sở hữu trong tay một Qmail server với miền mail hiện tại là 2mit.org . Và quản trị viên muốn triển khai dịch vụ mail server cho trường CĐ CNTT Hữu Nghị Việt Hàn với miền mail là viethanit.edu.vn thì rất đơn giản khi server đã tích hợp vpopmail, giúp ảo hoá các miền mail hosting. Và nhờ công vụ vqadmin có thể thao tác để tạo thêm miền mail viethanit.edu.vn một cách dễ dàng…
Tiến hành cài đặt.
Code:
[root@mail vpopmail-5.4.13]# cd /downloads/qmailrocks
[root@mail qmailrocks]# tar zxvf vqadmin-2.3.6.tar.gz
[root@mail qmailrocks]# cd vqadmin-2.3.6
[root@mail vqadmin-2.3.6]# ./configure --enable-cgibindir=/var/www/cgi-bin --enable-htmldir=/var/www/html
[root@mail vqadmin-2.3.6]# make && make install-strip
Chú ý. Để thực hiện được phần cài đặt này, Server đã cài đặt webserver httpd. Và thư mục chức website là /var/www/html .
Vì Vqadmin chạy trên giao diện web nên chúng ta phải cấu hình Apache
Code:
[root@mail vqadmin-2.3.6]# vi /etc/httpd/conf/httpd.conf
Thêm vào
Code:
deny from all
Options ExecCGI
AllowOverride AuthConfig
Order deny,allow
Chú ý: đoạn màu đỏ là đường dẫn đến thư mục chứa vqadmin mà chúng ta cài đặt
Cấu hình bảo mật cho Vqadmin
Code:
[root@mail vqadmin-2.3.6]# cd /var/www/cgi-bin/vqadmin
[root@mail vqadmin]#vi .htaccess
Sửa thành
Code:
AuthType Basic
AuthUserFile /etc/.htpasswd
AuthName vQadmin
require valid-user
satisfy any
Code:
Phân quyền.
[root@mail vqadmin]# chown apache .htaccess
[root@mail vqadmin]# chmod 644 .htaccess
Tạo file lưu thông tin đăng nhập cho vqadmin. File này chúng ta cho lưu ở /etc/.htpasswd
Code:
[root@mail vqadmin]# htpasswd -bc /etc/.htpasswd admin 121212
[root@mail vqadmin]# chmod 644 /etc/.htpasswd
Khởi động lại dịch vụ httpd
Code:
[root@mail vqadmin]# service httpd restart
Truy cập vào http://viet-cntt.com/cgi-bin/vqadmin/vqadmin.cgi , đăng nhập vào tài khoản và mật khẩu đã tạo để xem kết quả.


4.2.Cài đặt Maildrop
Maildrop được sử dụng để lọc khi thư được chuyển đến trên mail server. Khi cài đặt hoàn chỉnh, chúng ta không thấy được sự hoạt động của maildrop. Tuy nhiên, đó là một công cụ rất tốt và có giá trị có định để có được điên với bộ lọc thư imcoming vào mail server.
Code:
[root@mail vqadmin-2.3.6]# cd /downloads/qmailrocks
[root@mail maildrop-1.6.3]# tar zxvf maildrop-1.6.3.tar.gz
[root@mail maildrop-1.6.3]# cd maildrop-1.6.3
[root@mail maildrop-1.6.3]# ./configure --prefix=/usr/local --exec-prefix=/usr/local --enable-maildrop-uid=root --enable-maildrop-gid=vchkpw --enable-maildirquota
[root@mail maildrop-1.6.3]# make && make install-strip && make install-man
4.3.Cài đặt Qmailadmin
Qmailadmin cung cấp giao diện để quản lý cho người quản trị từng miền mail. Nhờ vào Qmailadmin, các postmaster của từng miền có thể tạo hộp thư, bí danh, fowards, robot mail, danh sách thư, quản lý email của miền mình…
Vd. Sau khi Quản trị viên của mail server 2mit.org đã tạo miền mail cho trường CĐ CNTT Hữu Nghị Việt Hàn. Nhu cầu đặt ra là phải có một công cụ quản trị cho các quản trị của trường Việt Hàn để họ quản lý, thêm, bớt, sửa... email cho các user của trường. Vì vậy Qmailadmin sinh ra để làm việc này. Nói tóm lại, công cụ này dành riêng cho từng miền mail.
Tiến hành cài đặt.
Code:
[root@mail maildrop-1.6.3]# cd /downloads/qmailrocks
[root@mail qmailrocks]# tar zxvf qmailadmin-1.2.9.tar.gz
[root@mail qmailrocks]# cd qmailadmin-1.2.9
[root@mail qmailadmin-1.2.9]# ./configure --enable-cgibindir=/var/www/cgi-bin --enable-htmldir=/var/www/html
[root@mail qmailadmin-1.2.9]# make && make install-strip
Truy cập vào địa chỉ http://www.viet-cntt.com/cgi-bin/qmailadmin để xem kết quả


Hình 4‑8 Giao diện quản lý các tài khoản email của miền viet-cntt.com
Hết phần 4.
Tiếp theo sẽ là Gỡ bỏ Sendmail, giây phút mong chờ... khởi động Qmail, cài đặt Courier IMAP/IMAPS....
Qmail - Phần 5: Cấu hình khởi động Qmail - Gỡ bỏ Sendmail và Khởi động Qmail
5.1.Cấu hình khởi động Qmail
Các phần trước SUNBOY đã hướng đẫn cấu hình các thành phần cần thiết cho qmail. Bây giờ là bước hoàn thành các cấu hình cho qmail hoạt động thống nhất. Sau đó sẽ gỡ bỏ Sendmail(nếu có) và khởi động qmail.
Đầu tiên, Chúng ta cần copy các script giám sát, các script qmail rc và qmailctl vào các thư mục thích hợp , sau đó thiết lập các quyền cần thiết để các script có thể hoạt động.
Sao chép tất cả các script giám sát đến các vị trí thích hợp.
Code:
[root@mail ~]# cp /downloads/qmailrocks/scripts/finalize/freebsd/pop3d_run /var/qmail/supervise/qmail-pop3d/run
[root@mail ~]# cp /downloads/qmailrocks/scripts/finalize/freebsd/pop3d_log /var/qmail/supervise/qmail-pop3d/log/run
[root@mail ~]# cp /downloads/qmailrocks/scripts/finalize/freebsd/smtpd_run /var/qmail/supervise/qmail-smtpd/run
[root@mail ~]# cp /downloads/qmailrocks/scripts/finalize/freebsd/smtpd_log /var/qmail/supervise/qmail-smtpd/log/run
[root@mail ~]# cp /downloads/qmailrocks/scripts/finalize/freebsd/send_run /var/qmail/supervise/qmail-send/run
[root@mail ~]# cp /downloads/qmailrocks/scripts/finalize/freebsd/send_log /var/qmail/supervise/qmail-send/log/run
Sao chép các script rc và qmailctl đến các vị trí thích hợp
Code:
[root@mail ~]# cp /downloads/qmailrocks/scripts/finalize/rc /var/qmail/
[root@mail ~]# cp /downloads/qmailrocks/scripts/finalize/qmailctl /var/qmail/bin/
Cấu hình các quyền và link cần thiết cho các script
Code:
[root@mail ~]# chmod 755 /var/qmail/rc /var/qmail/bin/qmailctl
[root@mail ~]# chmod 751 /var/qmail/supervise/qmail-pop3d/run
[root@mail ~]# chmod 751 /var/qmail/supervise/qmail-pop3d/log/run
[root@mail ~]# chmod 751 /var/qmail/supervise/qmail-smtpd/run
[root@mail ~]# chmod 751 /var/qmail/supervise/qmail-smtpd/log/run
[root@mail ~]# chmod 751 /var/qmail/supervise/qmail-smtpdssl/run
[root@mail ~]# chmod 751 /var/qmail/supervise/qmail-smtpdssl/log/run
[root@mail ~]# chmod 751 /var/qmail/supervise/qmail-send/run
[root@mail ~]# chmod 751 /var/qmail/supervise/qmail-send/log/run
[root@mail ~]# echo ./Maildir > /var/qmail/control/defaultdelivery
[root@mail ~]# echo 255 > /var/qmail/control/concurrencyremote
[root@mail ~]# chmod 644 /var/qmail/control/concurrencyremote
[root@mail ~]# echo 30 > /var/qmail/control/concurrencyincoming
[root@mail ~]# chmod 644 /var/qmail/control/concurrencyincoming
[root@mail ~]# ln -s /var/qmail/bin/qmailctl /usr/bin
[root@mail ~]# ln -s /var/qmail/supervise/qmail-send /var/qmail/supervise/qmail-smtpd /var/qmail/supervise/qmail-smtpdssl /var/qmail/supervise/qmail-pop3d /service
Chỉnh sửa cho các script phù hợp với server hiện tại.
Code:
[root@mail ~]# vi /var/qmail/supervise/qmail-pop3d/run
Sửa mail.example.com thành viet-cntt.com
Tiếp tục sửa
Code:
[root@mail ~]# vi /var/qmail/supervise/qmail-smtpd/run
Sửa mail.example.com thành viet-cntt.com
Dừng Qmail (nếu qmail đang chạy) để thực hiện các cấu hình cuối cùng
Code:
[root@mail ~]# qmailctl stop
Stopping qmail...
qmail-smtpd
qmail-send
qmail-pop3d
Code:
[root@mail ~]# echo '127.:allow,RELAYCLIENT=""' >> /etc/tcp.smtp
Code:
[root@mail ~]# qmailctl cdb
Tạo alias cho Qmail
Alias đóng vai trò quan trọng trong vấn đề quản lý mail server, điều này có nghĩa mỗi alias là một “ảo nhân” chịu trách nhiệm cho một số trường hợp điển hình của các hoạt động trên một mail server. Sau đây là 3 alias cần thiết nhất :
- postmaster (theo đúng RFC 2821) chỉ cho Administrator của mail server
- mailer-daemon một loại người dùng bán tiêu chuẩn để nhận các mail (bounce)
- root dùng để chuyển các loại mail mang tính chủ quyền đến system administrator
Ở đây giả sử mailbox của admin đảm nhận luôn cả ba alias trên. Thực hiện
Code:
[root@mail ~]# echo admin > /var/qmail/alias/.qmail-root
[root@mail ~]# echo admin > /var/qmail/alias/.qmail-postmaster
[root@mail ~]# echo admin > /var/qmail/alias/.qmail-mailer-daemon
[root@mail ~]# ln -s /var/qmail/alias/.qmail-root /var/qmail/alias/.qmail-anonymous
[root@mail ~]# chmod 644 /var/qmail/alias/.qmail-root /var/qmail/alias/.qmail-anonymous
[root@mail ~]# chmod 644 /var/qmail/alias/.qmail*
5.2.Gỡ bỏ Sendmail
Bước này nhằm gỡ bỏ MTA Sendmail (nếu đang tồn tại trên mail server, thông thường. Khi cài đặt CentOS thường đi kèm sendmail) và thay thế vào đó là Qmail
Kiểm tra các gói Sendmail có được cài đặt trên hệ thống hay không
Code:
[root@mail ~]# rpm -qa | grep sendmail
Nếu có, ngưng hoạt động Sendmail
Code:
[root@mail ~]# service sendmail stop
Gõ bỏ các gói sendmail
Code:
[root@mail ~]# rpm -e --nodeps sendmail-cf-8.13.8-8.el5
[root@mail ~]# rpm -e --nodeps sendmail-8.13.8-8.el5
Tuỳ chọn --nodeps để không bị lỗi phụ thuộc các gói khác
Sử dụng các liên kết mềm để thay thế Sendmail thành Qmail
Code:
[root@mail ~]# ln -s /var/qmail/bin/sendmail /usr/lib/sendmail
[root@mail ~]# ln -s /var/qmail/bin/sendmail /usr/sbin/sendmail
5.3.Khởi động Qmail
Trước khi khở động Qmail, tiến hành kiểm tra xem các bước cấu hình Qmail đã đầy đủ hay không bằng cách chạy script đã có sẵn. script này bao gồm hàng loạt các công đoạn kiểm tra. Nín thở xem kết quả nhé
Code:
[root@mail ~]# /downloads/qmailrocks/scripts/util/qmr_inst_check
Congratulations, your Qmailrocks.org Qmail installation looks good!
Nếu xuất hiện thông báo như trên nghĩa là các bước cấu hình đã đầy đủ.
Bắt đầu khởi động lại Qmail thôi!
Code:
[root@mail ~]# qmailctl stop
Stopping qmail...
qmail-smtpd
qmail-send
qmail-pop3d
Code:
[root@mail ~]# qmailctl start
Starting qmail...
Starting qmail-send
Starting qmail-smtpd
Starting qmail-pop3d
Cụ thể hơn, có thể xem bằng lệnh
Code:
[root@mail ~]# qmailctl stat
/service/qmail-send: up (pid 31999) 72 seconds
/service/qmail-send/log: up (pid 32000) 72 seconds
/service/qmail-smtpd: up (pid 32009) 72 seconds
/service/qmail-smtpd/log: up (pid 32003) 72 seconds
/service/qmail-pop3d: up (pid 32006) 72 seconds
/service/qmail-pop3d/log: up (pid 32007) 72 seconds
messages in queue: 0
messages in queue but not yet preprocessed: 0
Tiến hành telnet đến server với port 110 để kiểm tra hoạt động của POP3
Code:
[root@mail ~]# telnet localhost 110
Trying 127.0.0.1...
Connected to localhost.localdomain (127.0.0.1).
Escape character is '^]'.
+OK <14274.1290289849@viet-cntt.com>
user postmaster@viet-cntt.com
+OK
pass 121212
+OK
list
+OK
1 281
.
quit
+OK
Connection closed by foreign host.
Tiến hành telnet đến server với port 25 để kiểm tra hoạt động của SMTP
Kiểm tra chức năng TLS của SMTP
Code:
[root@mail ~]# telnet localhost 25
Trying 127.0.0.1...
Connected to localhost.localdomain (127.0.0.1).
Escape character is '^]'.
220 mail.viet-cntt.com ESMTP
ehlo
250-mail.viet-cntt.com
250-AUTH LOGIN CRAM-MD5 PLAIN
250-AUTH=LOGIN CRAM-MD5 PLAIN
250-STARTTLS
250-PIPELINING
250 8BITMIME
starttls
220 ready for tls
quit
quit
Connection closed by foreign host.
Nếu kết quả không có gì khác thường thì chúc mừng bạn. Qmail đã khởi động thành công và có vẻ hoạt động suôn sẻ.
Tới đây, bạn đã đi được 2/3 chặng đường. Đã có trong tay qmail nhưng chưa được đầy đủ các tiện ích. Đặt biệt là mới có POP3, mà chưa có IMAP/IMAPS. Phần sau sunboy sẽ hướng dẫn cài đặt tích hợp Courier IMAP/IMAPS, cổng webmail squierrel mail, tích hợp trình quét virus, chống spam cho Qmail....
Đầu tiên, Chào mừng các bạn đã đến với diễn đàn sinh viên Việt-Hàn 2MIT.ORG .Sau đây là chuyên đề về Qmail, SUN sẽ giới thiệu từ lý thuyết đến thực hành cấu hình một hệ thống mail server hoàn chỉnh sử dụng MTA Qmail. Tài liệu này được tác giả lấy từ nhiều nguồn khác nhau chủ yếu dịch từ trang qmailrocks.org và tham khảo trên HVA, tổng hợp, triển khai trên distro CentOS 5.
Một lời khuyên cho các bạn. Trước khi tham khảo và làm theo tài liệu này, các bạn nên ghé thăm trang chủ http://qmail.org, http://qmailrocks.org và bài hướng dẫn triển khai mail gateway sử dụng MTA Qmail của các bật tiền bối HVA.
Tài liệu tham khảo:
Sách:
[1]. The qmail Handbook - Dave Sill
Địa chỉ tham khảo thêm:
[1]. http://hvaonline.net
[2]. http://qmailrocks.org
[3]. http://qmail.org
[4]. http://www.courier-mta.org/
[5]. http://squirrelmail.org/
Phần 1: Giới thiệu về Qmail
1.1.Giới thiệu về Qmail
1.1.1. Sơ lược về Qmail
Qmail được viết bởi Tiến sĩ toán của trường đại học Illinois - Chicago ông Dan Bernstein. Qmail ra đời vào tháng Giêng năm 1996 với một phiên bản Beta 0.70 và sau đó phiên bản Gamma 0.90 được cập nhật vào tháng 8 năm 1996. Phiên bản ổn định 1.0 được ra mắt vào tháng 2 năm 1997. Phiên bản được lưu hành hiện nay là 1.03 được phát hành vào tháng 6 năm 1997.
Qmail là một MTA đầy đủ tính năng. Nó xử lý tất cả các tính năng cơ bản của một MTA bao gồm dịch vụ SMTP, POP3, SMTP delivery, xếp hàng và quản lý hàng đợi… hỗ trợ cho aliases , mailing, virtual users, virtual domains, và forwarding.
1.1.2. Tại sao dùng Qmail?
Có rất nhiều MTA trên môi trường Unix hiện nay và mỗi khi nhắc đến MTA chúng ta phải nhắc đến Sendmail. Sendmail được viết khi Internet là một môi trường rất thân thiện, không cần phải thiết kế đảm bảo vấn đề bảo mật cao. Ngày nay, Internet là một môi trường đầy nguy cơ với vấn đề bảo mật cho máy chủ mạng. Hơn nữa, Dan Bernstein viết Qmail vì ông ta thấy rằng Sendmail thừa hưởng nhiều lỗi bảo mật từ các phiên bản trước đây và phần mềm này rất cồng kềnh, cho dù những năm gần đây, nhóm Sendmail không ngừng điều chỉnh và cải tiến phần mềm này để giảm thiểu những yếu điểm.
Bernstein, người tạo nên Qmail tự tin rằng qmail là an toàn và ông đảm bảo nó trong tuyên báo bảo lãnh của mình (http://cr.yp.to/qmail/guarantee.html), ông còn cung cấp 1000 đôla trong một năm cho những ai tìm thấy lỗi bảo mật trong Qmail và giải thưởng này vẫn chưa có ai có thể đạt được.
Khi viết Qmail, ngoài ưu tiên cho vấn đề bảo mật, Dan Bernstein chú trọng rất nhiều đến khả năng hoạt động và tính dễ dùng của nó. Qmail mang tính truyền thống của các hoạt trình Unix: mỗi tiểu ứng trình có khả năng đảm đương trọn vẹn một chức năng chuyên biệt và các tiểu ứng trình này có thể chuyền (pipe) sang các tiểu ứng trình khác để đáp ứng các quy trình phức tạp. Bởi thế, Qmail bao gồm nhiều binaries tạo thành một dây chuyền hoạt động. Ðây là một điển hình nặng tính bảo mật và tính hiệu năng trong cơ chế điều hành của một MTA.
Qmail rất ổn định và hiệu năng: qmail thích hợp cho các mail server lớn với khả năng chuyển nhận hàng triệu thông điệp một ngày (dựa vào tài liệu trên web site của http://qmail.org).
Một số Mail server lớn trên internet sử dụng Qmail như Yahoo!, Network solutions, Verio, MessageLabs, listserv.acsu.buffalo.edu (một server mail lớn, sử dụng Qmail vào 1996), Ohio State (trường đại học lớn ở Mỹ), Listbot, USWest.net (Western US ISP), Telenordia, gmx.de (German ISP), NetZero (free ISP), Critical…
Qmail thích hợp cho các server có kết nối tốt, tốc độ, băng thông cao và luôn kết nối trên mạng. Với các doanh nghiệp, tổ chức vừa và nhỏ, chưa đáp ứng được các yêu cầu trên thì nên sử dụng các MTA khác phù hợp hơn như Posfix..
Sau đây là bản so sánh một số MTA trên hoạt động trên linux.
1.2.Cấu trúc Qmail
1.2.1.Cấu trúc hệ thống mô-đun


MTA trên Internet thực hiện nhiều nhiệm vụ. Thiết kế như Sendmail và Smail là thiết kế nguyên khối, nhưng đối với Qmail thì khác, Qmail được thiết kế theo dạng mô-đun. Các chương trình riêng biệt thực hiện các chức năng khác nhau. Các mô-đun của Qmail làm việc độc lập với nhau trên các quyền hệ thống khác nhau. Kết quả là chương trình được chia ra thành các chương trình nhỏ hơn, đơn giản hơn và ít bị các lỗi về chức năng, bảo mật… Hình mô tả cấu trúc mô-đun của Qmail.

1.2.2. Cấu trúc File
Thư mục /var/qmail mặc định là thư mục gốc của qmail khi được cài đặt. Chúng ta có thể thay đường dẫn này trong quá trình cài đặ qmail, đây cũng là ý tưởng tốt để tăng độ bảo mật, vì người khác sẽ khó khăn trong quá trình tìm kiếm thưc mục cài đặt của qmail.


Qmail - Phần 2: Cài đặt qmail từ mã nguồn.
Qmail - Phần 2: Cài đặt qmail từ mã nguồn.
Qmail - Phần 3: Cài đặt Ezmlm, Autoresponder, Vpopmail tích hợp MySQL
Qmail - Phần 4: Cài đặt Vqadmin, Maildrop và Qmailadmin
Qmail - Phần 5: Cấu hình khởi động Qmail - Gỡ bỏ Sendmail và Khởi động Qmail
Ở phần 1, SUN đã giới thiệu cho các bạn phần lý thuyết về MTA Qmail. Với phần 2 này, SUN sẽ giới thiệu cài đặt và cấu hình MTA Qmail bao gồm cài đặt gói qmail chính, cài đặtucspi-tcp và daemontools. Sau khi thực hành thành công phần 2 này, cơ bản bạn sẽ có một mail server với Qmail, nhưng thế vẫn chưa đủ. Còn rất nhiều thành phần cần thiết để đảm bảo một mail server hoạt động và cung cấp dịch vụ chuyên nghiệp. Các thành phần mở rộng cho qmail sẽ được giới thiệu ở phần 3 trở đi.
Trước tiên chúng ta sẽ đi vào các điều kiện cần thiết để biên dịch và cài đặt, vận hành mail server với qmail.
Phần 2.Cài đặt Qmail từ mã nguồn
2.1. Chuẩn bị trước khi cài đặt:
2.1.1. Thông tin Server
- Distro: Red Hat CentOS
- Hostname: mail.viet-cntt.com
- IP 192.168.137.20
- Dung lượng ổ đĩa.
+ Phân vùng / Khoảng 70Mb dung lượng ổ cứng
+ Phân vùng /var khoảng 10Mb
+ Phân vùng /home ít nhất 3Mb để chứa vpopmail
2.1.2. Các gói phần mềm cần cài đặt trước trên server
- Apache web server: Phiên bản 2.x trở lên
PHP: Phiên bản 4.0.6 trở lên. Trong /etc/php.ini . Chắc chắn rằng tham số file_uploads = On
- Perl: Phiên bản 4.8..0 trở lên.
- GCC: Bao gồm đầy đủ bộ thư viện biên dịch
- MySQL 4.x trở lên.
- OpenSSL và OpenSSL-devel : Phiên bản 0.9.5a trở lên hoặc cao hơn
- wget: Gói phần mền giúp download.
- patch & patchutils
- Máy Server DNS
+ Địa chỉ 192.168.137.12
+ Đã khai báo record MX trỏ tới server mail.viet-cntt.com
- Các port trên firewall cần được mở.

2.2.Cài đặt qmail từ mã nguồn.
2.2.1.Download và giải nén các gói cần thiết.
Lưu ý: trong quá trình cài đặt luôn luôn ở quyền root.
Code:
[root@mail ~]# mkdir /downloads
[root@mail ~]# cd /downloads
[root@mail downloads]# wget http://www.qmailrocks.org/downloads/qmailrocks.tar.gz
[root@mail downloads]# tar zxvf qmailrocks.tar.gz
Tạo các thư mục cần thiết:
Code:
[root@mail downloads]# cd /downloads/qmailrocks
Tạo thư mục khởi đầu cho qmail
[root@mail downloads]# mkdir -p /var/qmail
[root@mail downloads]# mkdir /usr/src/qmail
Giải nén các gói qmail, ucspi-tcp và daemontools.
Code:
[root@mail downloads]# cd /usr/src/qmail
[root@mail qmail]# tar zxvf /downloads/qmailrocks/qmail-1.03.tar.gz
[root@mail qmail]# tar zxvf /downloads/qmailrocks/ucspi-tcp-0.88.tar.gz
[root@mail qmail]# mkdir -p /package
[root@mail qmail]# chmod 1755 /package
[root@mail qmail]# cd /package
[root@mail package]# tar zxvf /downloads/qmailrocks/daemontools-0.76.tar.gz
Tạo tài khoản dân dụng và các nhóm dân dụng
Code:
[root@mail ~]# groupadd nofiles
[root@mail ~]# useradd -g nofiles -d /var/qmail/alias -s /sbin/nologin -p'*' alias
[root@mail ~]# useradd -g nofiles -d /var/qmail -s /sbin/nologin -p'*' qmaild
[root@mail ~]# useradd -g nofiles -d /var/qmail -s /sbin/nologin -p'*' qmaill
[root@mail ~]# useradd -g nofiles -d /var/qmail -s /sbin/nologin -p'*' qmailp
[root@mail ~]# groupadd qmail
[root@mail ~]# useradd -g qmail -d /var/qmail -s /sbin/nologin -p'*' qmailq
[root@mail ~]# useradd -g qmail -d /var/qmail -s /sbin/nologin -p'*' qmailr
[root@mail ~]# useradd -g qmail -d /var/qmail -s /sbin/nologin -p'*' qmails
[root@mail ~]# groupadd vchkpw
[root@mail ~]# useradd -g vchkpw -d /home/vpopmail -s /sbin/nologin -p'*' vpopmail
Tạo và phân quyền các thư mục chứa log
Code:
[root@mail package]# mkdir /var/log/qmail
[root@mail package]# cd /var/log/qmail
[root@mail qmail]# mkdir qmail-send qmail-smtpd qmail-pop3d
[root@mail qmail]# chown -R qmaill:root /var/log/qmail
[root@mail qmail]# chmod -R 750 /var/log/qmail
Tạo và phân quyền các thư mục chứa các scripts giám sát.
Code:
[root@mail qmail]# mkdir /var/qmail/supervise
[root@mail qmail]# cd /var/qmail/supervise
[root@mail supervise]# mkdir -p qmail-smtpd/log qmail-send/log qmail-pop3d/log
[root@mail supervise]# chmod +t qmail-smtpd qmail-send qmail-pop3d
[root@mail supervise]# echo 211 > /usr/src/qmail/qmail-1.03/conf-split
[root@mail supervise]# echo 255 > /usr/src/qmail/qmail-1.03/conf-spawn
2.2.2.Cài đặt Qmail
Thực hiện các miếng vá cần thiết trước khi đi vào cài đặt
Code:
[root@mail ~]# PATH=/usr/local/bin:/usr/bin:/bin:/usr/local/sbin:/sbin
[root@mail ~]# cd /usr/src/qmail/qmail-1.03
[root@mail ~]# patch < /downloads/qmailrocks/patches/qmail-1.03-jms1.5.patch [root@mail ~]# patch < /downloads/qmailrocks/patches/qmail-1.03-forcetls-20040703.patch Bắt đầu thực hiện compile và build qmail. [root@mail ~]# cd /usr/src/qmail/qmail-1.03 [root@mail qmail-1.03]# make man && make setup check Lệnh make buộc compiler biên dịch mã nguồn của qmail dựa trên chỉnh định của hồ sơ Makefile. Lệnh make setup check. Ðây là 2 lệnh gom lại thành một.. Lệnh thứ nhất make setup chuyển các binaries đã được build ở trên vào đúng nơi của nó. Lệnh thứ nhì make check là lệnh dùng để kiểm tra lại thực tính của các hồ sơ và binaries được build. Ðánh lệnh ./config-fast với thông số là domain name Code: [root@mail qmail-1.03]# ./config-fast mail.viet-cntt.com Lệnh trên dùng để khai báo thống số tên miền. Đã xong quá trình cài đặt gói qmail chính, tiếp theo thực hiện cài đặt chứng nhận an toàn sử dụng để mã hóa TLS trong các phiên làm việc của SMTP Code: [root@mail qmail-1.03]# make cert Điền các thông số cần thiết. Code: Country Name (2 letter code) [GB]:VN State or Province Name (full name) [Berkshire]:VietNam Locality Name (eg, city) [Newbury]:DaNang Organization Name (eg, company) [My Company Ltd]:VietHanIT Organizational Unit Name (eg, section) []:mail Common Name (eg, your name or your server's hostname) []:mail.viet- cntt.com Email Address []:postmaster@viet-cntt.com Nếu quá trình thực hiện thành công sẽ tự động cài đặt ở /var/qmail/control/servercert.pem và các liên kết mềm ở /var/qmail/control/clientcert.pem 2.2.3.Cài đặt ucspi-tcp Ucspi-tcp là phần mềm Dr. Dan Bernstein viết với mục đích thay thế cho inet daemon của Unix. Inet daemon được dùng rộng rãi trên các ứng trình Unix và gần đây, xinet ra đời để nâng cao tính năng của inet. Theo Dr Bernstein, phần mềm ucspi-tcp gọn nhẹ, hiệu quả và an toàn hơn inet rất nhiều. Ucspi-tcp được tạo ra với quan tâm bảo mật nên cách xử lý socket giữa client và server rất hiệu quả. Thực tế cho thấy ucspi-tcp hoạt động rất phù hợp với qmail. Di chuyển con trỏ vào thư mục uscpi-tcp để compile và build uscpi-tcp Code: [root@mail qmail-1.03]# cd /usr/src/qmail/ucspi-tcp-0.88/ Thực hiện compile và build Code: [root@mail qmail-1.03]# patch < /downloads/qmailrocks/patches/ucspi-tcp-0.88.errno.patch [root@mail qmail-1.03]# make && make setup check 2.2.4. Cài đặt daemontools Daemontools là một phần mềm giúp bạn rất nhiều trong quy trình quản lý và điều hành qmail server. Thực hiện các miếng vá cần thiết Code: [root@mail ucspi-tcp-0.88]# cd /package/admin/daemontools-0.76/src [root@mail src]# patch < /downloads/qmailrocks/patches/daemontools-0.76.errno.patch [root@mail src]#cd /package/admin/daemontools-0.76 [root@mail daemontools-0.76]# package/install Để kiểm tra xem daemontools có cài đặt thành công hay không, ta thực hiện lệnh xem tiến trình ps –aux . Nếu xuất hiện tiến trình svcanboot nghĩa là đã cài đặt thành công.

Nếu không có lõi gì xảy ra, cơ bản chúng ta đã có một mail server với MTA là qmail, phần tiếp theo SUN sẽ trình bày cho các bạn các thành phần khác kết hợp với Qmail như Ezmlm, Vqadmin....
Qmail - Phần 3: Cài đặt Ezmlm, Autoresponder, Vpopmail tích hợp MySQL
Tiếp theo phần này. SUN sẽ hướng dẫn các bạn cài đặt các tiện ích cho Qmail như Ezmlm, Autoresponder và Vpopmail
3.1.Cài đặt Ezmlm
Ezmlm là tiện ích cộng thêm cho Qmail, giúp quản lý danh sách email rất tốt. Đặt biệt là tích hợp với Qmailadmin (Qmail admin sẽ được giới thiệu ở các phần sau).
Chúng ta đi vào biên dịch và cài đặt
Code:
[root@mail src]# cd /downloads/qmailrocks/
[root@mail qmailrocks]# tar zxvf ezmlm-0.53-idx-0.41.tar.gz
[root@mail qmailrocks]# cd ezmlm-0.53-idx-0.41
[root@mail ezmlm-0.53-idx-0.41]# make && make setup
3.2.Cài đặt Autoresponder
Autoresponder là tiện ích giúp trả lời thư tự động. Chúng ta có thể không cấu hình tiện ích này nhưng nếu một hệ thống mail hoàn chỉnh thì tính năng này được khuyên dùng.
Code:
[root@mail ezmlm-0.53-idx-0.41]# cd /downloads/qmailrocks
[root@mail qmailrocks]# tar zxvf autorespond-2.0.5.tar.gz
[root@mail qmailrocks]# cd autorespond-2.0.5
[root@mail autorespond-2.0.5]# make && make install
3.3.Cài đặt Vpopmail tích hợp MySQL
Vpopmail là một trong những thành phần chính trong quá trình cài đặt qmail. Vpopmail giúp chúng ta làm ảo miền mail hosting, bao gồm rất nhiều tính năng để việc quản lý mail đơn giản và thuận tiện.
Có hai cách cài đặt Vpopmail là cách không tích hợp MySQL và cách có tích hợp MySQL. Quá trình cài đặt không tích hợp MySQL sẽ đơn giản hơn nhiều vì không liên quan đến cấu hình tích hợp MySQL. Đối với các mail server với quy mô lớn, lời khuyên đến từ các chuyên gia qmail là nên cài đặt tích hợp MySQL để tăng hiệu xuất hoạt động.
Khi cấu hình và cài đặt vpopmail tích hợp MySQL. Tất cả thông tin về các domain (tên miền, người dùng email, mật khẩu..) đều được lưu trữ trong cơ sở dữ liệu mysql. Các nội dung các email gởi tới không được lưu giữ trong cơ sở dữ liệu và vẫn lưu giữ trong các khu vực riêng tùy chọn vào người quản trị cấu hình Vpopmail.
Code:
[root@mail ~]# mkdir ~vpopmail/etc
[root@mail ~]# chown vpopmail:vchkpw ~vpopmail/etc
[root@mail ~]# echo "localhost|0|admin|121212|vpopmail" > ~vpopmail/etc/vpopmail.mysql
Câu lệnh trên dùng để khai báo người sử dụng vpopmail với tài khoản là admin và mật khẩu là 121212
Code:
[root@mail ~]# chown vpopmail:vchkpw ~vpopmail/etc/vpopmail.mysql
[root@mail ~]# chmod 640 ~vpopmail/etc/vpopmail.mysql
Khởi động dịch vụ MySQL bằng lệnh service mysql start, nếu mật khẩu root chưa khai báo, ta tiến hành khai báo mật khẩu tài khoản root của MySQL là 121212 bằng lệnh.
Code:
[root@mail ~]# service mysqld start
[root@mail ~]# mysqladmin -u root password 121212
Đăng nhập vào MySQL với tài khoảng root và mật khẩu vừa tạo để tạo database có tên vpopmail
Code:
[root@mail ~]# mysql -u root -p
mysql> CREATE DATABASE vpopmail;
Query OK, 1 row affected (0.00 sec)
Chèn các thông tin đăng nhập của người dùng Vpopadmin vào MySQL. Cụ thể tên đăng nhập là admin, mật khẩu là 121212
Code:
mysql> GRANT select,insert,update,delete,create,drop ON vpopmail.* TO admin@localhost IDENTIFIED BY '121212';
mysql>quit
Code:
[root@mail ~]# cd /downloads/qmailrocks
[root@mail qmailrocks]# tar zxvf vpopmail-5.4.13.tar.gz
[root@mail qmailrocks]# cd vpopmail-5.4.13
[root@mail vpopmail-5.4.13]# ./configure --enable-logging=p --enable-auth-module=mysql --disable-passwd --enable-clear-passwd --disable-many-domains --enable-auth-logging --enable-sql-logging --enable-valias --disable-mysql-limit
[root@mail vpopmail-5.4.13]# make && make install-strip
Đã xong phần 3. Phần 4 mình sẽ trình bày về vqadmin, maildrop, qmailadmin...
-SUN-
Qmail - Phần 4: Cài đặt Vqadmin, Maildrop và Qmailadmin.
Bây giờ khi đã thực hiện xong phần 1, 2, 3. Chúng ta sẽ tiếp tục với phần 4 để cài đặt các tiện ích không thể thiếu cho Qmail như Vqadmin, Maildrop, Qmailadmin.
4.1.Cài đặt Vqadmin
Vqadmin đơn giản là một giao diện web, qua đó cho phép chúng ta quản lý Vpopmail. Thông qua giao diện có thể tạo ra các miền mới, người dùng mới, áp đặt các hạng ngạch, cho phép các dịch vụ và nhiều hơn nữa.
Vậy Vqadmin dành cho ai ? Câu trả lời là vqadmin dành cho người quản trị có quyền cao nhất sử dụng.
Một ví dụ cụ thể, quản trị viên đang sở hữu trong tay một Qmail server với miền mail hiện tại là 2mit.org . Và quản trị viên muốn triển khai dịch vụ mail server cho trường CĐ CNTT Hữu Nghị Việt Hàn với miền mail là viethanit.edu.vn thì rất đơn giản khi server đã tích hợp vpopmail, giúp ảo hoá các miền mail hosting. Và nhờ công vụ vqadmin có thể thao tác để tạo thêm miền mail viethanit.edu.vn một cách dễ dàng…
Tiến hành cài đặt.
Code:
[root@mail vpopmail-5.4.13]# cd /downloads/qmailrocks
[root@mail qmailrocks]# tar zxvf vqadmin-2.3.6.tar.gz
[root@mail qmailrocks]# cd vqadmin-2.3.6
[root@mail vqadmin-2.3.6]# ./configure --enable-cgibindir=/var/www/cgi-bin --enable-htmldir=/var/www/html
[root@mail vqadmin-2.3.6]# make && make install-strip
Chú ý. Để thực hiện được phần cài đặt này, Server đã cài đặt webserver httpd. Và thư mục chức website là /var/www/html .
Vì Vqadmin chạy trên giao diện web nên chúng ta phải cấu hình Apache
Code:
[root@mail vqadmin-2.3.6]# vi /etc/httpd/conf/httpd.conf
Thêm vào
Code:
deny from all
Options ExecCGI
AllowOverride AuthConfig
Order deny,allow
Chú ý: đoạn màu đỏ là đường dẫn đến thư mục chứa vqadmin mà chúng ta cài đặt
Cấu hình bảo mật cho Vqadmin
Code:
[root@mail vqadmin-2.3.6]# cd /var/www/cgi-bin/vqadmin
[root@mail vqadmin]#vi .htaccess
Sửa thành
Code:
AuthType Basic
AuthUserFile /etc/.htpasswd
AuthName vQadmin
require valid-user
satisfy any
Code:
Phân quyền.
[root@mail vqadmin]# chown apache .htaccess
[root@mail vqadmin]# chmod 644 .htaccess
Tạo file lưu thông tin đăng nhập cho vqadmin. File này chúng ta cho lưu ở /etc/.htpasswd
Code:
[root@mail vqadmin]# htpasswd -bc /etc/.htpasswd admin 121212
[root@mail vqadmin]# chmod 644 /etc/.htpasswd
Khởi động lại dịch vụ httpd
Code:
[root@mail vqadmin]# service httpd restart
Truy cập vào http://viet-cntt.com/cgi-bin/vqadmin/vqadmin.cgi , đăng nhập vào tài khoản và mật khẩu đã tạo để xem kết quả.


4.2.Cài đặt Maildrop
Maildrop được sử dụng để lọc khi thư được chuyển đến trên mail server. Khi cài đặt hoàn chỉnh, chúng ta không thấy được sự hoạt động của maildrop. Tuy nhiên, đó là một công cụ rất tốt và có giá trị có định để có được điên với bộ lọc thư imcoming vào mail server.
Code:
[root@mail vqadmin-2.3.6]# cd /downloads/qmailrocks
[root@mail maildrop-1.6.3]# tar zxvf maildrop-1.6.3.tar.gz
[root@mail maildrop-1.6.3]# cd maildrop-1.6.3
[root@mail maildrop-1.6.3]# ./configure --prefix=/usr/local --exec-prefix=/usr/local --enable-maildrop-uid=root --enable-maildrop-gid=vchkpw --enable-maildirquota
[root@mail maildrop-1.6.3]# make && make install-strip && make install-man
4.3.Cài đặt Qmailadmin
Qmailadmin cung cấp giao diện để quản lý cho người quản trị từng miền mail. Nhờ vào Qmailadmin, các postmaster của từng miền có thể tạo hộp thư, bí danh, fowards, robot mail, danh sách thư, quản lý email của miền mình…
Vd. Sau khi Quản trị viên của mail server 2mit.org đã tạo miền mail cho trường CĐ CNTT Hữu Nghị Việt Hàn. Nhu cầu đặt ra là phải có một công cụ quản trị cho các quản trị của trường Việt Hàn để họ quản lý, thêm, bớt, sửa... email cho các user của trường. Vì vậy Qmailadmin sinh ra để làm việc này. Nói tóm lại, công cụ này dành riêng cho từng miền mail.
Tiến hành cài đặt.
Code:
[root@mail maildrop-1.6.3]# cd /downloads/qmailrocks
[root@mail qmailrocks]# tar zxvf qmailadmin-1.2.9.tar.gz
[root@mail qmailrocks]# cd qmailadmin-1.2.9
[root@mail qmailadmin-1.2.9]# ./configure --enable-cgibindir=/var/www/cgi-bin --enable-htmldir=/var/www/html
[root@mail qmailadmin-1.2.9]# make && make install-strip
Truy cập vào địa chỉ http://www.viet-cntt.com/cgi-bin/qmailadmin để xem kết quả


Hình 4‑8 Giao diện quản lý các tài khoản email của miền viet-cntt.com
Hết phần 4.
Tiếp theo sẽ là Gỡ bỏ Sendmail, giây phút mong chờ... khởi động Qmail, cài đặt Courier IMAP/IMAPS....
Qmail - Phần 5: Cấu hình khởi động Qmail - Gỡ bỏ Sendmail và Khởi động Qmail
5.1.Cấu hình khởi động Qmail
Các phần trước SUNBOY đã hướng đẫn cấu hình các thành phần cần thiết cho qmail. Bây giờ là bước hoàn thành các cấu hình cho qmail hoạt động thống nhất. Sau đó sẽ gỡ bỏ Sendmail(nếu có) và khởi động qmail.
Đầu tiên, Chúng ta cần copy các script giám sát, các script qmail rc và qmailctl vào các thư mục thích hợp , sau đó thiết lập các quyền cần thiết để các script có thể hoạt động.
Sao chép tất cả các script giám sát đến các vị trí thích hợp.
Code:
[root@mail ~]# cp /downloads/qmailrocks/scripts/finalize/freebsd/pop3d_run /var/qmail/supervise/qmail-pop3d/run
[root@mail ~]# cp /downloads/qmailrocks/scripts/finalize/freebsd/pop3d_log /var/qmail/supervise/qmail-pop3d/log/run
[root@mail ~]# cp /downloads/qmailrocks/scripts/finalize/freebsd/smtpd_run /var/qmail/supervise/qmail-smtpd/run
[root@mail ~]# cp /downloads/qmailrocks/scripts/finalize/freebsd/smtpd_log /var/qmail/supervise/qmail-smtpd/log/run
[root@mail ~]# cp /downloads/qmailrocks/scripts/finalize/freebsd/send_run /var/qmail/supervise/qmail-send/run
[root@mail ~]# cp /downloads/qmailrocks/scripts/finalize/freebsd/send_log /var/qmail/supervise/qmail-send/log/run
Sao chép các script rc và qmailctl đến các vị trí thích hợp
Code:
[root@mail ~]# cp /downloads/qmailrocks/scripts/finalize/rc /var/qmail/
[root@mail ~]# cp /downloads/qmailrocks/scripts/finalize/qmailctl /var/qmail/bin/
Cấu hình các quyền và link cần thiết cho các script
Code:
[root@mail ~]# chmod 755 /var/qmail/rc /var/qmail/bin/qmailctl
[root@mail ~]# chmod 751 /var/qmail/supervise/qmail-pop3d/run
[root@mail ~]# chmod 751 /var/qmail/supervise/qmail-pop3d/log/run
[root@mail ~]# chmod 751 /var/qmail/supervise/qmail-smtpd/run
[root@mail ~]# chmod 751 /var/qmail/supervise/qmail-smtpd/log/run
[root@mail ~]# chmod 751 /var/qmail/supervise/qmail-smtpdssl/run
[root@mail ~]# chmod 751 /var/qmail/supervise/qmail-smtpdssl/log/run
[root@mail ~]# chmod 751 /var/qmail/supervise/qmail-send/run
[root@mail ~]# chmod 751 /var/qmail/supervise/qmail-send/log/run
[root@mail ~]# echo ./Maildir > /var/qmail/control/defaultdelivery
[root@mail ~]# echo 255 > /var/qmail/control/concurrencyremote
[root@mail ~]# chmod 644 /var/qmail/control/concurrencyremote
[root@mail ~]# echo 30 > /var/qmail/control/concurrencyincoming
[root@mail ~]# chmod 644 /var/qmail/control/concurrencyincoming
[root@mail ~]# ln -s /var/qmail/bin/qmailctl /usr/bin
[root@mail ~]# ln -s /var/qmail/supervise/qmail-send /var/qmail/supervise/qmail-smtpd /var/qmail/supervise/qmail-smtpdssl /var/qmail/supervise/qmail-pop3d /service
Chỉnh sửa cho các script phù hợp với server hiện tại.
Code:
[root@mail ~]# vi /var/qmail/supervise/qmail-pop3d/run
Sửa mail.example.com thành viet-cntt.com
Tiếp tục sửa
Code:
[root@mail ~]# vi /var/qmail/supervise/qmail-smtpd/run
Sửa mail.example.com thành viet-cntt.com
Dừng Qmail (nếu qmail đang chạy) để thực hiện các cấu hình cuối cùng
Code:
[root@mail ~]# qmailctl stop
Stopping qmail...
qmail-smtpd
qmail-send
qmail-pop3d
Code:
[root@mail ~]# echo '127.:allow,RELAYCLIENT=""' >> /etc/tcp.smtp
Code:
[root@mail ~]# qmailctl cdb
Tạo alias cho Qmail
Alias đóng vai trò quan trọng trong vấn đề quản lý mail server, điều này có nghĩa mỗi alias là một “ảo nhân” chịu trách nhiệm cho một số trường hợp điển hình của các hoạt động trên một mail server. Sau đây là 3 alias cần thiết nhất :
- postmaster (theo đúng RFC 2821) chỉ cho Administrator của mail server
- mailer-daemon một loại người dùng bán tiêu chuẩn để nhận các mail (bounce)
- root dùng để chuyển các loại mail mang tính chủ quyền đến system administrator
Ở đây giả sử mailbox của admin đảm nhận luôn cả ba alias trên. Thực hiện
Code:
[root@mail ~]# echo admin > /var/qmail/alias/.qmail-root
[root@mail ~]# echo admin > /var/qmail/alias/.qmail-postmaster
[root@mail ~]# echo admin > /var/qmail/alias/.qmail-mailer-daemon
[root@mail ~]# ln -s /var/qmail/alias/.qmail-root /var/qmail/alias/.qmail-anonymous
[root@mail ~]# chmod 644 /var/qmail/alias/.qmail-root /var/qmail/alias/.qmail-anonymous
[root@mail ~]# chmod 644 /var/qmail/alias/.qmail*
5.2.Gỡ bỏ Sendmail
Bước này nhằm gỡ bỏ MTA Sendmail (nếu đang tồn tại trên mail server, thông thường. Khi cài đặt CentOS thường đi kèm sendmail) và thay thế vào đó là Qmail
Kiểm tra các gói Sendmail có được cài đặt trên hệ thống hay không
Code:
[root@mail ~]# rpm -qa | grep sendmail
Nếu có, ngưng hoạt động Sendmail
Code:
[root@mail ~]# service sendmail stop
Gõ bỏ các gói sendmail
Code:
[root@mail ~]# rpm -e --nodeps sendmail-cf-8.13.8-8.el5
[root@mail ~]# rpm -e --nodeps sendmail-8.13.8-8.el5
Tuỳ chọn --nodeps để không bị lỗi phụ thuộc các gói khác
Sử dụng các liên kết mềm để thay thế Sendmail thành Qmail
Code:
[root@mail ~]# ln -s /var/qmail/bin/sendmail /usr/lib/sendmail
[root@mail ~]# ln -s /var/qmail/bin/sendmail /usr/sbin/sendmail
5.3.Khởi động Qmail
Trước khi khở động Qmail, tiến hành kiểm tra xem các bước cấu hình Qmail đã đầy đủ hay không bằng cách chạy script đã có sẵn. script này bao gồm hàng loạt các công đoạn kiểm tra. Nín thở xem kết quả nhé
Code:
[root@mail ~]# /downloads/qmailrocks/scripts/util/qmr_inst_check
Congratulations, your Qmailrocks.org Qmail installation looks good!
Nếu xuất hiện thông báo như trên nghĩa là các bước cấu hình đã đầy đủ.
Bắt đầu khởi động lại Qmail thôi!
Code:
[root@mail ~]# qmailctl stop
Stopping qmail...
qmail-smtpd
qmail-send
qmail-pop3d
Code:
[root@mail ~]# qmailctl start
Starting qmail...
Starting qmail-send
Starting qmail-smtpd
Starting qmail-pop3d
Cụ thể hơn, có thể xem bằng lệnh
Code:
[root@mail ~]# qmailctl stat
/service/qmail-send: up (pid 31999) 72 seconds
/service/qmail-send/log: up (pid 32000) 72 seconds
/service/qmail-smtpd: up (pid 32009) 72 seconds
/service/qmail-smtpd/log: up (pid 32003) 72 seconds
/service/qmail-pop3d: up (pid 32006) 72 seconds
/service/qmail-pop3d/log: up (pid 32007) 72 seconds
messages in queue: 0
messages in queue but not yet preprocessed: 0
Tiến hành telnet đến server với port 110 để kiểm tra hoạt động của POP3
Code:
[root@mail ~]# telnet localhost 110
Trying 127.0.0.1...
Connected to localhost.localdomain (127.0.0.1).
Escape character is '^]'.
+OK <14274.1290289849@viet-cntt.com>
user postmaster@viet-cntt.com
+OK
pass 121212
+OK
list
+OK
1 281
.
quit
+OK
Connection closed by foreign host.
Tiến hành telnet đến server với port 25 để kiểm tra hoạt động của SMTP
Kiểm tra chức năng TLS của SMTP
Code:
[root@mail ~]# telnet localhost 25
Trying 127.0.0.1...
Connected to localhost.localdomain (127.0.0.1).
Escape character is '^]'.
220 mail.viet-cntt.com ESMTP
ehlo
250-mail.viet-cntt.com
250-AUTH LOGIN CRAM-MD5 PLAIN
250-AUTH=LOGIN CRAM-MD5 PLAIN
250-STARTTLS
250-PIPELINING
250 8BITMIME
starttls
220 ready for tls
quit
quit
Connection closed by foreign host.
Nếu kết quả không có gì khác thường thì chúc mừng bạn. Qmail đã khởi động thành công và có vẻ hoạt động suôn sẻ.
Tới đây, bạn đã đi được 2/3 chặng đường. Đã có trong tay qmail nhưng chưa được đầy đủ các tiện ích. Đặt biệt là mới có POP3, mà chưa có IMAP/IMAPS. Phần sau sunboy sẽ hướng dẫn cài đặt tích hợp Courier IMAP/IMAPS, cổng webmail squierrel mail, tích hợp trình quét virus, chống spam cho Qmail....
Monday, March 14, 2011
Limit user login & disable login by root
- Step 1: Create banner-ssh for all server (5 min.)
vi /etc/ssh/banner-ssh.txt
You can not acess ssh by root user to server. Please using another user
- Step 2: Config sshd_config file (1 day)
vi /etc/ssh/sshd_config
…..
#Banner
Banner /etc/ssh/banner-ssh.txt
…..
(end of sshd_config file)
###################################
# DeneyUsers modified by Your Users ##
###################################
DenyUsers ALL
###################################
# AllowUsers modified by User ########
###################################
AllowUsers User1@ipaddress User2@ipaddress User3@ipaddress UserVPN@192.168.90.0/24
save & exit sshd_config file
restart ssh: rcsshd restart
-Step5: check result
When you try ssh you will receive warning text:
You can not acess ssh by root user to this server. Please using another user
Changing From SquirrelMail To Atmail Open With ISPConfig 3
http://www.howtoforge.com/changing-from-squirrelmail-to-atmail-open-with-ispconfig-3
Step 1 - Create A Database
First we need to create a database for Atmail.
* Open up ISPConfig and go to Sites.
* Select Database from the sub-navigation menu on the left.
* Click on Add new Database
* Create a Database name, Database user and a Database password
Step 2 - Backup Squirrelmail
Just in case it all goes wrong - we need to backup Squirrelmail.
cd /usr/share
mv squirrelmail squirrelmail.bak
mkdir squirrelmail
Step 3 -Download, Unpack And Remove Unnecessary Files
I was unable to get the latest version of Atmail open to work with my setup. For the purpose of this tutorial; we will be using v1.01 - Please feel free to let me know if you find a way to get the latest version working.
cd squirrelmail
wget http://downloads.sourceforge.net/atmailopen/atmailopen-1.01.tgz
tar xvfz atmailopen-1.01.tgz
cd atmailopen
mv * ../
cd ../
rm –r atmailopen
rm atmailopen-1.01.tgz
Step 4 - Make Atmail Open Writeable For Apache
chown –R [Apache-user] /usr/share/squirrelmail
Please note: On Debian systems, replace [Apache-user] with www-data. The Apache user on other Linux distributions might be different.
Step 5 - Install Atmail Open To Your Server
In your preferred browser, go to http://yourdomain.tld/webmail. You'll be required to read the on-screen instructions and read the licence agreement. Providing you accept you can continue!
Step 6 - Connect To The Database
In Step 1 we created a database in ISPConfig and we're now need to enter the details into the AtMail Open...

Step 7 - Define The SMTP Host
Enter the SMTP Host (in this example we assume it is localhost). Whether or not you require Authentication (e.g. if you need to use a mail relayer to send e-mail) and an Administrator E-mail Address.

Step 8 - Import Data From SquirrelMail (Or Another Webmail System)
At this step, you have the possibility to import data from other popular webmail systems. Should you decide to do this, please select Squirremail and enter the database connetion settings and click 'Continue'

Step 9 - All done! Log In To Atmail Open
You can now log in to your new Atmail Open Webmail system! It's all good to go from here but if you like, follow Step 10 to customise your login screen.

Step 10 - Customise The Login Screen
In this step we will cover how to remove the Mailserver, Language and Protocol fields from the login screen and define default settings so we don't need to input them manually everytime we login.
vi /usr/share/squirrelmail/html/login-light.html
Find the lines below and edit accordingly...
Login Header / Title text
< td >Webmail Access< /td >
Instructions to login / Custom Message
< td >< div id="AuthStatus" class="logintext" style="padding-left: 4px;" >Please provide your username and password.< /div >< /td >
Hide 'Mailserver; field from login page and set default to 'localhost'
Find...
< tr id="mailserver" >
And change to...
< tr id="mailserver" style="display:none;" >
Find...
< td align="left" >< input name="MailServer" type="text" class="logininput" id="MailServer">< /td >
And change to...
< td align="left" >< input name="MailServer" type="text" class="logininput" id="MailServer" value="localhost" >< /td >
Hide protocol from login page
Find...
< tr id="protocol" >
And change to...
< tr id="protocol" style="display:none;" >
Hide Language from login page
Find...
< tr >
< td > < /td >
< td colspan="2" align="right" >Language:< /td >
And change the < tr > tag to...
< tr style="display:none;" >
Please let me know if you have any suggestions to improve this tutorial... Enjoy!
Sunday, March 13, 2011
Out of range trong linux
- step 1: log on root ---> init 3
- step 2: sax2 start
- step 3: reboot server one time
- step 2: sax2 start
- step 3: reboot server one time
Thursday, March 10, 2011
Crack root password for SLES
1. Boot server from the installation CD.
2. Then select any installation method or Rescue System.
3. At the first installation screen when selecting language, press ctrl-alt-f2 to open a virtual console.
Note: If you selected Rescue System, select your keyboard language and then a Rescue Login prompt should appear. Login as root.
4. Type
fdisk -l
to list the partitions. Locate the Linux root partition.
5. Type
mount /dev/sda4 /mnt
(replace sda4 with the device name for the Linux root partition identified in the previous step).
6. Run
mount -o bind /dev /mnt/dev
to make the device files available (this is needed for access to the urandom device which may be used by the passwd command below).
7. Enter
chroot /mnt
8. Now enter
passwd root
and reset the root password.
9. Type
exit
to leave the chroot environment.
10. Unmount the filesystem with
umount /mnt
11. Reboot the system.
Sunday, March 6, 2011

Authentication Token Manipulation Error when Changing User Passwords in Zentyal Linux
Vo LDAP setting ----> Unmarked Enable PAM


Thursday, March 3, 2011
HOWTO - OpenVPN + LDAP authentication in pfSense 1.2.2
http://forum.pfsense.org/index.php/topic,14946.0.html
Here's a quick and dirty guide on getting OpenVPN to authenticate against LDAP in pfSense 1.2.2. This may not work for every install, but it worked on a bare install for me. I suggest you have a functional OpenVPN server instance before making these changes:
On the pfsense box:
1. User pkg_add -r to install the following packages: openvpn-auth-ldap, gcc43, gmake, texinfo
- texinfo and gmake are not explicitly needed for this install, but some FreebSD 7.0 ports fail on installation without them
2. Under VPN -> OpenVPN -> Server, add plugin /usr/local/lib/openvpn-auth-ldap.so /usr/local/etc/auth-ldap.conf to the Custom Options field of the server instance which will be tying to LDAP.
3. Paste the openvpn-auth-ldap configuration template from http://code.google.com/p/openvpn-auth-ldap/wiki/Configuration into /usr/local/etc/opencpn-auth-ldap.conf (or whichever location you would like to use, just make sure that the line in your openvpn Custom Options from step 2 matches this location). Edit this configuration to your liking.
4. Symlink /usr/local/lib/gcc-4.3.0/libobjc.so.2 to /usr/local/lib/libobjc.so.3
5. Restart the OpenVPN service with killall -HUP openvpn, or by clicking Save on the WebGUI configuration page.
On clients
The only change that need to be made on connecting client configurations is the addition of the auth-user-pass directive. Upon connecting, the client will ask for a username and password which will be forwarded to the server for authentication, and the server will be checking those supplied credentials against the LDAP server specified in the openvpn-auth-ldap configuration file.
** NOTES **
If anyone has a clean way to solve the missing libobjc.so.3 library, throw it up here. If that gets solved, then this whole setup could be included as a viable option in the normal pfSense releases.
Subscribe to:
Posts (Atom)