1. Boot server from the installation CD.
2. Then select any installation method or Rescue System.
3. At the first installation screen when selecting language, press ctrl-alt-f2 to open a virtual console.
Note: If you selected Rescue System, select your keyboard language and then a Rescue Login prompt should appear. Login as root.
4. Type
fdisk -l
to list the partitions. Locate the Linux root partition.
5. Type
mount /dev/sda4 /mnt
(replace sda4 with the device name for the Linux root partition identified in the previous step).
6. Run
mount -o bind /dev /mnt/dev
to make the device files available (this is needed for access to the urandom device which may be used by the passwd command below).
7. Enter
chroot /mnt
8. Now enter
passwd root
and reset the root password.
9. Type
exit
to leave the chroot environment.
10. Unmount the filesystem with
umount /mnt
11. Reboot the system.
Thursday, March 10, 2011

Sunday, March 6, 2011

Authentication Token Manipulation Error when Changing User Passwords in Zentyal Linux
Vo LDAP setting ----> Unmarked Enable PAM


Thursday, March 3, 2011
HOWTO - OpenVPN + LDAP authentication in pfSense 1.2.2
http://forum.pfsense.org/index.php/topic,14946.0.html
Here's a quick and dirty guide on getting OpenVPN to authenticate against LDAP in pfSense 1.2.2. This may not work for every install, but it worked on a bare install for me. I suggest you have a functional OpenVPN server instance before making these changes:
On the pfsense box:
1. User pkg_add -r to install the following packages: openvpn-auth-ldap, gcc43, gmake, texinfo
- texinfo and gmake are not explicitly needed for this install, but some FreebSD 7.0 ports fail on installation without them
2. Under VPN -> OpenVPN -> Server, add plugin /usr/local/lib/openvpn-auth-ldap.so /usr/local/etc/auth-ldap.conf to the Custom Options field of the server instance which will be tying to LDAP.
3. Paste the openvpn-auth-ldap configuration template from http://code.google.com/p/openvpn-auth-ldap/wiki/Configuration into /usr/local/etc/opencpn-auth-ldap.conf (or whichever location you would like to use, just make sure that the line in your openvpn Custom Options from step 2 matches this location). Edit this configuration to your liking.
4. Symlink /usr/local/lib/gcc-4.3.0/libobjc.so.2 to /usr/local/lib/libobjc.so.3
5. Restart the OpenVPN service with killall -HUP openvpn, or by clicking Save on the WebGUI configuration page.
On clients
The only change that need to be made on connecting client configurations is the addition of the auth-user-pass directive. Upon connecting, the client will ask for a username and password which will be forwarded to the server for authentication, and the server will be checking those supplied credentials against the LDAP server specified in the openvpn-auth-ldap configuration file.
** NOTES **
If anyone has a clean way to solve the missing libobjc.so.3 library, throw it up here. If that gets solved, then this whole setup could be included as a viable option in the normal pfSense releases.
Here's a quick and dirty guide on getting OpenVPN to authenticate against LDAP in pfSense 1.2.2. This may not work for every install, but it worked on a bare install for me. I suggest you have a functional OpenVPN server instance before making these changes:
On the pfsense box:
1. User pkg_add -r to install the following packages: openvpn-auth-ldap, gcc43, gmake, texinfo
- texinfo and gmake are not explicitly needed for this install, but some FreebSD 7.0 ports fail on installation without them
2. Under VPN -> OpenVPN -> Server, add plugin /usr/local/lib/openvpn-auth-ldap.so /usr/local/etc/auth-ldap.conf to the Custom Options field of the server instance which will be tying to LDAP.
3. Paste the openvpn-auth-ldap configuration template from http://code.google.com/p/openvpn-auth-ldap/wiki/Configuration into /usr/local/etc/opencpn-auth-ldap.conf (or whichever location you would like to use, just make sure that the line in your openvpn Custom Options from step 2 matches this location). Edit this configuration to your liking.
4. Symlink /usr/local/lib/gcc-4.3.0/libobjc.so.2 to /usr/local/lib/libobjc.so.3
5. Restart the OpenVPN service with killall -HUP openvpn, or by clicking Save on the WebGUI configuration page.
On clients
The only change that need to be made on connecting client configurations is the addition of the auth-user-pass directive. Upon connecting, the client will ask for a username and password which will be forwarded to the server for authentication, and the server will be checking those supplied credentials against the LDAP server specified in the openvpn-auth-ldap configuration file.
** NOTES **
If anyone has a clean way to solve the missing libobjc.so.3 library, throw it up here. If that gets solved, then this whole setup could be included as a viable option in the normal pfSense releases.
Thursday, February 24, 2011
Monday, February 21, 2011
Setup VPN server on Draytek Vigor 2900
http://www.draytek.com/user/SupportAppnotesDetail.php?ID=135
Host to LAN VPN ( Teleworker to Vigor ) - Bulit in VPN client - WinXP to Vigor Router - PPTP
a. Remote User Profile Setup ( Teleworker ) : [ for example : Vigor2900V ]
1. In Vigor's web configuration page, click VPN and Remote access Setup -› Remote User Profile Setup (Teleworker).
 2. Type in the username and password for this remote dial-in user, then click OK. Now this specified user can dial-in to Vigor router now.

3. When the user successfully dialed in, you may see the connection status in System Management -› VPN Connection Management.

b. Client Settings :
1. Create a New Connection by selecting "Start -› Settings -› Network Connections".

2. Select "Connect to the network at my workplace", then click Next.

3. Select "Virtual Private Network connection", then click Next.

4. Type a name to distinguish this VPN connection, then click Next.

5. Type the IP address or host name of VPN server.

6. Click Finish to complete the wizard initialization.

7. Type the username and password in the pop-up windows, then click "Properties".

8. Select the Networking tab. In the Types of VPN option, select PPTP VPN.

9. Click Connect.

10. Now you can see the authentication process status.

Host to LAN VPN ( Teleworker to Vigor ) - Bulit in VPN client - WinXP to Vigor Router - PPTP
a. Remote User Profile Setup ( Teleworker ) : [ for example : Vigor2900V ]
1. In Vigor's web configuration page, click VPN and Remote access Setup -› Remote User Profile Setup (Teleworker).


3. When the user successfully dialed in, you may see the connection status in System Management -› VPN Connection Management.

b. Client Settings :
1. Create a New Connection by selecting "Start -› Settings -› Network Connections".

2. Select "Connect to the network at my workplace", then click Next.

3. Select "Virtual Private Network connection", then click Next.

4. Type a name to distinguish this VPN connection, then click Next.

5. Type the IP address or host name of VPN server.
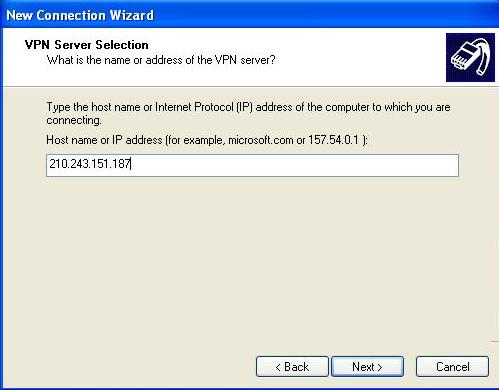
6. Click Finish to complete the wizard initialization.

7. Type the username and password in the pop-up windows, then click "Properties".

8. Select the Networking tab. In the Types of VPN option, select PPTP VPN.

9. Click Connect.

10. Now you can see the authentication process status.

HƯỚNG DẪN CẤU HÌNH IP ALIAS TRÊN VIGOR 2110F
WAN IP Alias được sử dụng trong trường hợp bạn có nhiều IP Public và được chạy trên cùng một WAN. Bạn có thể cài đặt được 8 IP Public và được chạy duy nhất trên WAN 1. Có 2 cách để cấu hình IP Public: IP for route và IP for NAT (IP Alias).
Ví dụ: bạn có dãy IP Public 113.161.118.112, Subnet mask 255.255.255.248, dãy IP Public mà bạn được sử dụng 113.161.118.112 113.161.118.118
a. Cấu hình IP for route:
Lan General Setup
For IP Routing Usage: Enable
2nd IP Adreess: 113.161.118.113
2nd Subnet Mask: 255.255.255.248

Trên máy tính bạn gán IP Public và trỏ IP gateway về router 113.161.118.113

a. Cấu hình IP for NAT (IP Alias):
Internet Access PPPoE: bạn click vào WAN IP Alias , chọn Enable và nhập dãy IP Public mà bạn được sử dụng.

Trong phần NAT bao gồm Port Redirecion, DMZ Host, Open Ports. Bạn có thể NAT theo từng tính năng và gán IP Public vào WAN IP.
Port Redirection:

DMZ Host:

Open Ports:

Ví dụ: bạn có dãy IP Public 113.161.118.112, Subnet mask 255.255.255.248, dãy IP Public mà bạn được sử dụng 113.161.118.112 113.161.118.118
a. Cấu hình IP for route:
Lan General Setup
For IP Routing Usage: Enable
2nd IP Adreess: 113.161.118.113
2nd Subnet Mask: 255.255.255.248

Trên máy tính bạn gán IP Public và trỏ IP gateway về router 113.161.118.113

a. Cấu hình IP for NAT (IP Alias):
Internet Access PPPoE: bạn click vào WAN IP Alias , chọn Enable và nhập dãy IP Public mà bạn được sử dụng.

Trong phần NAT bao gồm Port Redirecion, DMZ Host, Open Ports. Bạn có thể NAT theo từng tính năng và gán IP Public vào WAN IP.
Port Redirection:

DMZ Host:

Open Ports:

Subscribe to:
Posts (Atom)