Search This Blog

Sunday, March 6, 2011

Zentyal Error when disable interfaces automatically

- Disable Wan Failover

- Nang ti le % len 90%


Authentication Token Manipulation Error when Changing User Passwords in Zentyal Linux

Vo LDAP setting ----> Unmarked Enable PAM

Thursday, March 3, 2011

HOWTO - OpenVPN + LDAP authentication in pfSense 1.2.2

http://forum.pfsense.org/index.php/topic,14946.0.html


Here's a quick and dirty guide on getting OpenVPN to authenticate against LDAP in pfSense 1.2.2. This may not work for every install, but it worked on a bare install for me. I suggest you have a functional OpenVPN server instance before making these changes:

On the pfsense box:

1. User pkg_add -r to install the following packages: openvpn-auth-ldap, gcc43, gmake, texinfo
- texinfo and gmake are not explicitly needed for this install, but some FreebSD 7.0 ports fail on installation without them

2. Under VPN -> OpenVPN -> Server, add plugin /usr/local/lib/openvpn-auth-ldap.so /usr/local/etc/auth-ldap.conf to the Custom Options field of the server instance which will be tying to LDAP.

3. Paste the openvpn-auth-ldap configuration template from http://code.google.com/p/openvpn-auth-ldap/wiki/Configuration into /usr/local/etc/opencpn-auth-ldap.conf (or whichever location you would like to use, just make sure that the line in your openvpn Custom Options from step 2 matches this location). Edit this configuration to your liking.

4. Symlink /usr/local/lib/gcc-4.3.0/libobjc.so.2 to /usr/local/lib/libobjc.so.3

5. Restart the OpenVPN service with killall -HUP openvpn, or by clicking Save on the WebGUI configuration page.

On clients

The only change that need to be made on connecting client configurations is the addition of the auth-user-pass directive. Upon connecting, the client will ask for a username and password which will be forwarded to the server for authentication, and the server will be checking those supplied credentials against the LDAP server specified in the openvpn-auth-ldap configuration file.

** NOTES **

If anyone has a clean way to solve the missing libobjc.so.3 library, throw it up here. If that gets solved, then this whole setup could be included as a viable option in the normal pfSense releases.

Thursday, February 24, 2011

Monday, February 21, 2011

Setup VPN server on Draytek Vigor 2900

http://www.draytek.com/user/SupportAppnotesDetail.php?ID=135

Host to LAN VPN ( Teleworker to Vigor ) - Bulit in VPN client - WinXP to Vigor Router - PPTP


a. Remote User Profile Setup ( Teleworker ) : [ for example : Vigor2900V ]

1. In Vigor's web configuration page, click VPN and Remote access Setup -› Remote User Profile Setup (Teleworker).


2. Type in the username and password for this remote dial-in user, then click OK. Now this specified user can dial-in to Vigor router now.

3. When the user successfully dialed in, you may see the connection status in System Management -› VPN Connection Management.

b. Client Settings :

1. Create a New Connection by selecting "Start -› Settings -› Network Connections".


2. Select "Connect to the network at my workplace", then click Next.

3. Select "Virtual Private Network connection", then click Next.


4. Type a name to distinguish this VPN connection, then click Next.

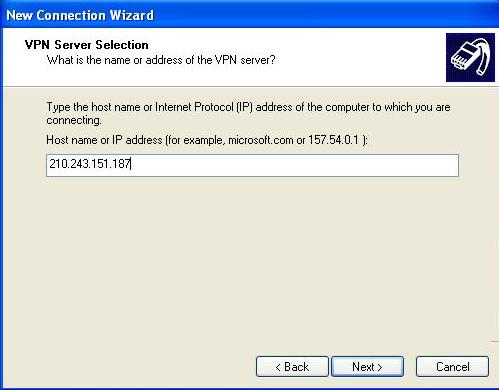
5. Type the IP address or host name of VPN server.

6. Click Finish to complete the wizard initialization.

7. Type the username and password in the pop-up windows, then click "Properties".

8. Select the Networking tab. In the Types of VPN option, select PPTP VPN.

9. Click Connect.

10. Now you can see the authentication process status.

HƯỚNG DẪN CẤU HÌNH IP ALIAS TRÊN VIGOR 2110F

WAN IP Alias được sử dụng trong trường hợp bạn có nhiều IP Public và được chạy trên cùng một WAN. Bạn có thể cài đặt được 8 IP Public và được chạy duy nhất trên WAN 1. Có 2 cách để cấu hình IP Public: IP for route và IP for NAT (IP Alias).
Ví dụ: bạn có dãy IP Public 113.161.118.112, Subnet mask 255.255.255.248, dãy IP Public mà bạn được sử dụng 113.161.118.112  113.161.118.118
a. Cấu hình IP for route:
Lan  General Setup
For IP Routing Usage: Enable
2nd IP Adreess: 113.161.118.113
2nd Subnet Mask: 255.255.255.248


Trên máy tính bạn gán IP Public và trỏ IP gateway về router 113.161.118.113


a. Cấu hình IP for NAT (IP Alias):
Internet Access  PPPoE: bạn click vào WAN IP Alias , chọn Enable và nhập dãy IP Public mà bạn được sử dụng.


Trong phần NAT bao gồm Port Redirecion, DMZ Host, Open Ports. Bạn có thể NAT theo từng tính năng và gán IP Public vào WAN IP.
Port Redirection:


DMZ Host:

Open Ports:

Friday, February 18, 2011

Cài đặt và sử dụng font trong Ubuntu

Cài đặt phông chữ cho Ubuntu
Tháng Tư 30, 2007 — duc.ngtuan

Ubuntu LogoUbuntu khi cài đặt cũng đã “tặng kèm” một bộ phông chữ rồi, nhưng đáng tiếc là bộ phông chữ đó hơi… kém về cả lượng lẫn chất. Những phông chữ như trên Windows không được cài đặt mặc định nên đa số các trang web sẽ hiển thị với kiểu chữ rất lạ, khác mọi khi bạn vẫn thấy. Phông chữ loại sans (Phông không chân, như Arial, Vernada, Tahoma,…) mà Linux có sẵn hiển thị khá đẹp, nhưng những phông loại serif (phông chữ có chân như Times New Roman, Palatino, Georgia…) của Linux thì lại hơi tồi.

Cài đặt thêm phông chữ cho Ubuntu thì chả có gì khó. Nhưng do vấn đề bản quyền nên chúng không được cài đặt mặc định. Bạn buộc phải tự nhúng tay vào thôi, nếu chưa hài lòng với những phông chữ của Ubuntu.

1. Cài đặt bộ phông chữ cho Web của Windows

Đa số các web site đều sử dụng hầu như cùng 1 bộ phông chữ mặc định, đó là Arial, Verdana, Trebuchet MS, Times New Roman, Georgia. Cài đặt xong bộ phông chữ này, nhìn các trang web trong Ubuntu sẽ “khoái” hơn nhiều :-) .

Mở cửa sổ dòng lệnh bằng cách chọn menu Applications > Accessories > Terminal rồi gõ lệnh:

sudo apt-get install msttcorefonts

Vậy là xong rồi nhé :-) . Có thể bạn phải khởi động lại trước khi thấy sự biến đổi.

2. Thêm phông sẵn có cho Ubuntu

Bạn có sẵn một số phông Truetype (.ttf) và muốn cài đặt vào Ubuntu để sử dụng? Quá đơn giản, bạn chọn Places > Home Folder, sau đó chuyển đến nơi chứa các phông chữ bạn muốn cài đặt:

Minh hoạ cài đặt font chữ bước 1

Ấn Ctrl + N để mở cửa sổ mới, nhấn tiếp Ctrl + L và gõ vào thanh địa chỉ fonts:/// như trong hình rồi nhấn enter để mở thư mục chứa phông chữ.

Minh hoạ cài đặt font chữ bước 2

Bây giờ những gì bạn cần làm chỉ là kéo thả tử cửa sổ này qua cửa sổ kia mà thôi.

Cập nhật lại font:

$ sudo fc-cache -fv

Posted in Ubuntu. 25 phản hồi »